• Welcome to this website/forum for people interested in the Morgan 38 Sailboat. Many of our members are 'owners' of Morgan 38s, but you don't need to be an owner to Register/Join.

New owner, 1979 382 "Island girl"

I second Warren.
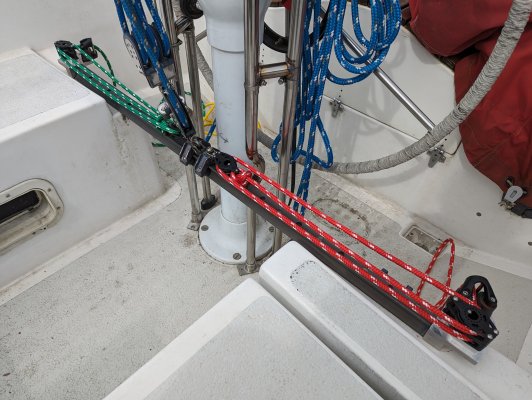
I doubt anyone used it for Pole controls. That looks more like what is in my Lifesling for hoisting of person overboard. And using it would probably create more hassle in that situation.

I don't think I have any other tackle like that on Sonata. Other than perhaps the Cunningham setup.
 
The boom vang is a double block setup, and goes to a winch on the right side of the boom, and it works well. I'll toss that spare block and line back under the helm seat, maybe I'll find a use for it sometime. I also found a bosun's chair today, under some fenders in the port cockpit locker. So many places to hide stuff, I'm still uncovering it!
To use a bosun's, would I use the main halyard for that?
 
That block might have been for a bosun chair(for someone to pull themself up), but having the snap shackles would be a really bad idea for that. And it might not be enough purchase.

You can use any halyard for a bosun's chair that gets you where you need to be. Preferably 2 halyards, one to lift, and another as a safety.
 
Well I dodged a bullet there. Was down under the binnacle feeding the raymarine st60 wiring out a hole I drilled, and inspected the steering pullies, and something didn't look right, one of the bronze pulley axles was halfway out, it was missing one of it's split pins. Crisis averted I think.
Got the traveller done, decided to go with colour correct lines.
 

Attachments

  • PXL_20240316_182304423.jpg
    PXL_20240316_182304423.jpg
    2.9 MB · Views: 60
Yes, i think edson sells replacement axels and maybe new bushings to press into the sheave.
Edson seems to have moved away from bronze for most things. The new sheaves are aluminum. I think bronze is better.
I would remove the whole assembly for inspection. The plate was made from steel, and most are rusty and compromised by now. Its a common failure to have the plate bend and break. The new part is thick aluminum and should last forever.
 
i consider Bronze superior for most boat purposes. But it seems to have gone out of favor. On the other hand, the switch to stainless axles made sense to me.
 
Yeah, I think I prefer bronze. SS is cheaper, and I think stronger, but brittle. SS will break, and bronze will bend a bit first. And bronze won't rust.

The sprocket in the pedestal is Bronze. The knurling for the break is worn smooth on mine, and the replacement is stainless. And expensive. Not sure what it would cost for a machine shop to knurl my old part.
 
I'll admit, the whole pulley plate and pullies look really nice, after a new split pin was installed of course. Fresh water is much more time friendly on old yachts for sure. I do need to pull the top of the steering binnacle apart and inspect it, especially after seeing this near catastrophe.

If you zoom in on the last pic of the traveller setup you can see the S bends I had to weld in to make the car clear the add on binnacle.

Dave.
 
Back in Michigan working on Island Girl for two days. Then have to drive to a race car test at Mid Ohio sports car course for two more days. Not much rest this month.
I finally got the two ST60 Raymarine displays powered up. But I really don't know if they work. Need to get a helper to blow on the little water wheel for the speed display. The depth, see the pic, should I see some sort of distance measurement out of the water? And, what is the usual, and preferred way to set the depth, from the surface, distance under the keel, or?
 

Attachments

  • PXL_20240513_220103074.jpg
    PXL_20240513_220103074.jpg
    1.9 MB · Views: 29
I would set depth from the bottom of the Keel. Either 5' or if you have the deeper, 6' below the waterline.
I also think the boat will need to be in the water to read depth. Transducers need to be surrounded by fluid.
 
I am very adamant about this. Depth is ALWAYS the depth of the water, and NEVER the depth below the keel. I don't know how that Idea started, but it is a very bad one. The instrument has an offset adjustment specifically so that you can set the depth to the depth of water, use it.

Consider, you find a nice place to anchor, in about 10 feet of water, which reads 5' below the keel. You put out 3:1 scope, which is recommended for a modern anchor in good conditions, that would be 15' based on your depth sounder. But that measurement is really to your bow roller! Depth in this case is 17', not 5 feet! You just put out 15' of scope in 17' of depth! (depth of water plus distance to bow roller).

So, to anchor, you need to add the depth from the depth sounder, add the depth of the keel, and then add 2 feet, and then multiply by your intended scope. What a PITA, and at a time that is stressful for many at times. Most certainly, setting the depth to the depth under the keel doesn't make any math easier, and doesn't allow you to forget the depth of the keel. All is does is make your boat different from what that instrument is supposed to read and makes it confusing for anyone that has ever piloted any other boat.

Do I think this would actually happen while anchoring? Probably not. But it is far more ridiculous to think knowing your draft is 5', that you might not know that the depth sounder should always read more than 5 feet. If you can't figure that out, then 100%, you are going to make the former mistake while anchoring.

Want another reason? Navionics updates charts based on depth readings from users, automatically in some cases, from chart plotters or phone apps using Navionics charts. What a mess if some of those people use depth under keel without thinking about the consequences.

And if for no other reason, because practically every other boat reads depth of water, and because that is what the instrument is supposed to read, don't confuse experienced crew by being different.

The sounder will not work out of the water. Which is unfortunate because you can't change it while in the water.

The race car thing sounds fun. What is going on?
 
Warren, you make excellent points, and I didn't know I couldn't change it once the boat is in the water, so I will change it to water depth next time I am up there, boat is still in the yard until the end of the month.
I am, aside from having a composites and engineering business, work for a small race team, crew chief on a USF2000 car. At a two day test at Mid Ohio now after delivering carbon fiber military parts to a customer, I went to the Morgan to get a couple of days of work in between.
 
What I meant is that you can't change the transducer for a new one if it is defective while the boat is in the water. You can set the offset for depth below keel or depth of water whenever you like.
The car sounds fun! As crew chief, do you get to drive a few laps?
 
Ahh, I understand! Big column of water comes in if you try to change it, yes.
If my car finishes on the podium, 1, 2 or 3rd, the driver stays there for the awards etc, so I drive it back to the truck. Often out on the track. Fun little cars.
 
Will be putting Island Girl in the water this Friday, so am trying to get all the parts machined and fabricated by tomorrow night. On the last trip there I found the pulley inside the boom, that turns the 1st reef line up to the reef point on the luff, was flogged out, nylon pulley with it's bush gone. So I cnc machined a replacement out of bronze, in the pic.
The bow roller channel was, well, just plain awful, mounted with hardware store threaded rod and clamp plates that weren't even drilled on the right centers. So I fabricated a decent mount and Samson bar and TIG welded it all together, from many measurements I took. Hope it fits.
 

Attachments

  • PXL_20240527_134724669.jpg
    PXL_20240527_134724669.jpg
    3.3 MB · Views: 24
  • PXL_20240528_223617903.jpg
    PXL_20240528_223617903.jpg
    2.5 MB · Views: 29
Yes! Very impressive. Very nice.
The stainless anchor roller on Sonata was quite tweaked too. Though no hardware store stuff. I managed to get it bent back to shape finally and replaced the rubber roller with a new Lewmar version. But of course I had to trim the width on the lathe to fit. The old one was so out of round from years with an anchor sitting on it.
 
  • Like
Reactions: DGA
Back from a couple of days putting her in the water and a sail out in lake St Clair. All the work I had done over the winter was well worth it. So, some observations, and a few questions.

I was done with the 150 Genoa last season so fitted the jib instead. This was a very good thing I think. Much less heeling yet the same speeds. Had 10 to 25 knot winds and this seemed like a perfect sail for that. About half the weather helm, force to hold the wheel. So much easier to tack with instead of dragging that 150 over the shrouds, it just flips over quickly. Very nice.

I set up to run downwind so I could experiment with the jibe preventer line, worked well, I let the main back wind and the preventer kept the boom where it was. Lot of load on that line at that point, but I had ran the line through the large cheek block, with cam, that is behind the aft winch, then back to that winch, good plan I thought.

My new traveler was nice. Can now make small trim changes without leaving the helm, and watch the speed change on the now working ST60 instrument. I sailed close to the wind and could take the traveller past center and gain a few degrees more, nice. I have 3:1 on that system, and it needs that much to adjust under load.

I had never put diesel in the tank, it was full when I bought it. I was worried about the guage calibration and that maybe it was almost empty. So at the fuel dock I had the wife call out at each 5 gallons, and I put a mark on the gauge bezel, so at least I have some idea what is in it . Was amazed that I only had to put in 25 gallons, with the hours of motoring up and down the St Clair river. Marine diesel has no road tax on it, at least in Michigan, and was about 50 cents cheaper a gallon.

The water tanks were, well, in one word, nasty. So I had pumped a bleach and water mix in them through a hose that I had ty-wrapped sponges to the end and scrubbed as the bleach pumped in, and repeated that over and over. Now, the water does not have an odor to it, very nice.

Yes, that is 7.2 feet deep there in the pic, St Clair isn't much deeper than 12 feet mostly.

Questions; the Rariton PH1 toilet, that I had rebuilt last year with a rebuild kit, works, but not well. We are both mostly over it. So, what pump unit could I replace it with? Electric might be nice? I'd rather not replace the whole bowl and everything.
 

Attachments

  • PXL_20240601_174011407.jpg
    PXL_20240601_174011407.jpg
    2.8 MB · Views: 18
It sounds like you have made some great progress with Island Girl. Congratulations.

Sonata has a Raritan phI-II that had been converted to electric with the kit that Raritan makes. But if I remember correctly the conversion is the better part of a new manual head. And it's kind of a kludge. I've rebuilt it once but it still leaks a little too. Also the motor looks to be a pile of rust ready to fail. But it keeps working, though not quietly.
I'm about ready to replace it, soon anyway. I'm looking at a Thetford Nano or Raritan Marine Elegance.

I'll be aboard Sonata this week and get some pics for you if youd like. I'll be checking measurements to nail down which head to buy. Let me know if you need any info...
Mitchell
 
Thanks Mitchell. If you see any part numbers on the electric conversion, let me know. I could always get a non compatible pump, and CNC machine an adapter I guess, or something like that. But bolt on parts saves one more work trip to measure etc. Have yet another race event this week in Wisconsin so that will take time away from boat part manufacture!
 
Dave where are you attaching the forward end of your main preventer? I used to use my forward cleats, but this year had my machinist make new attachment points that are bolted to the forward gunwales. If I remember, I will post photos.
 
I attached it to the point just aft of the chain locker, that someone had added. Very strong point, a huge aluminum angle backing plate under it. Also in the pic, the remains of the nasty bow roller/ channel attachment hardware that I had to abrasive wheel cut into pieces to remove.
 

Attachments

  • PXL_20240530_202552714.jpg
    PXL_20240530_202552714.jpg
    4.8 MB · Views: 23
It has been said that the conversion for the PH series head converts it from the best available manual head to the worst available electric head. The conversion is just a motor the pumps the arm of the manual pump. The advantage is you can still operate it as a manual pump if you need to.
They don't seem to show the conversion on their website anymore. Instead they show a newer conversion to a newer toilet, where all you keep is the porcelain bowl.
 
I think I saw that, does seem a bit substandard for what it could be. I did a little research, Jabsco have an electric full size, well, not compact, eBay have them for about $544, shipping included. This is the whole toilet.
I'm guessing I would have to drill new holes in the mount. Unless they all have standard mounting points? In any case, I want a brand that I might have a chance of getting parts for at some point.
 
Jabsco are quite popular and parts are available everywhere. All of the major boat builds use Jabsco. Raritan is a US brand, high quality, but parts are harder to find, and very difficult to find outside the US. There is a good chance the holes will line up.
 
DGA,
Here on another forum by Peggie Hall, who quite literally wrote the book on marine sanitation, heads, and oders. This irregardless to electrifying the PH series.
I agree with her, having one myself.

"Don't do it...

Adding a motor to a PH II only replaces the pump handle...it doesn't replace the pump. And it turns one of the finest--if not THE finest--manual toilets into a VERY poor excuse for an electric toilet. Why? Because the pump is still the same manual pump...but the motor pumps it with a much shorter faster stroke. Which means it takes longer to prime, wearing out the seals and o-rings at least twice as fast as the manual version does...and causes it to choke on flushes that slow deliberate pumping by hand would make it swallow. It has only one reason to exist: in the event of a total power failure (in which case the inabilibity to flush the toilet would be the least of your problems) it can be disconnected from the motor and pumped by hand. If you want an electric toilet, go with one that was designed to BE an electric toilet, not a hybrid. The Raritan SeaEra isn't the "household throne" that the Atlantes is, but is an excellent choice for any sailboat. Available in both raw water and pressurized fresh water flush models, uses very litte more flush water in either version, and the most reliable electric macerating toilet on the market."
 
Sounds about right. My PH1 is the older model that does not have a cartridge top plunger seal, the bush is worn out and I find I have to lift the handle quickly to try to overcome that seal leak.
Time for it to go I think.
We went to visit my sisters in New Zealand in February, one of them has a very new 25' power boat. It has an impossibly tiny bathroom, but the electric toilet was great, and the wife reminded me of that. As for her boat, I reasoned that trips in it were for the destination only, it beats you up over small waves, but with the Morgan, it's about the trip and the destination.
 
On the boat this afternoon trying to get this Jabsco toilet installed. Couple of questions. This translucent cover on the side of the shower seat; if I remove it, will I be able to get access to the toilet base bolts, or are they studs or? Totally different bolt centers so I have to either bolt it from the underside or fit rivnuts or something.
Second pic, this is the aft of the fridge, trash door opening. The angled wood bracket left of the trash door, what is that for? Would like to remove it to add some insulation around the fridge. After the engine runs for awhile, the fridge struggles to cycle and just runs all the time. Also, what might that disconnected water line be for in there?
 

Attachments

  • PXL_20240620_194232288.jpg
    PXL_20240620_194232288.jpg
    1.6 MB · Views: 19
  • PXL_20240620_164816215.jpg
    PXL_20240620_164816215.jpg
    4 MB · Views: 22
Not sure on access to the bolts in the head. I might consider using the existing bolts to install a wood or starboard block, and have the new toilet mount through that block. That would also raise the toilet an inch or so which might be desirable. Consideration should be given to how you will clean behind the toilet. It's a PITA.

Re: the fridge. Originally, the fridge came as an icebox. Right about where that wood bracket is, there was a handpump, with a handle that extended into the galley. The pump and grey hose, pumped water out of the icebox and to the torpedo tube cockpit drain. The shower drain grey pipe also runs under the icebox and exits that area someplace on its way to the cockpit drain.

There are several threads on icebox rebuilding. It is a really big job, removing the counter, cutting out the fiberglass liner, adding 4+ inches of insulation, then building a new liner. Totally worth it though. I did mine in about 8 days of about 8-10 hour working each day, spread out over 4 weekends. Then another 2 days to install new laminate in the entire galley.
 
Thanks Warren. I drilled pilot holes into the toilet base, it's pretty thick, maybe 3/8" to 1/2", so I think I will just use 5/16" stainless lag bolts, simple and solid I think. Had to rotate the jabsco motor unit 90 degrees, no room behind it for the motor but it fits nicely on the aft side, closest to the sink. But now I know why the old pump type Raritan stank all the time, there is no way that thing had enough pumping action to lift the pee up and over the loop, and it basically came back into the bowl.
Amazed at the thought of yet another pump for the fridge. I'll remove that mount. I read your whole fridge rebuild, I'll likely never have time for that much work. I added an electronic fridge control, so now I see what is going on with it. It's not bad if you don't run the engine. So a couple of pieces of 1" thick foil backed foam board on the inboard and aft of it should make a big difference.
 

Attachments

  • 17189176267635236073505158556884.jpg
    17189176267635236073505158556884.jpg
    1.3 MB · Views: 23
If the fiberglass where the toilet sits is 3/8 ", don't use lag bolts. Drill and tap holes in the base. Mine has bolts sticking up that fits the toilet. Just put on nuts.

On the icebox, I rebuilt mine without teari8ng everything apart. I had several fiberglass enclosed vacuum panels specially made to fit into the existing box (claimed R value of 40, I believe.) https://www.pacificseabreeze.com/about_us .. I epoxied those in like a jig saw puzzle. For further protection, I put a layer of 1" blue board over the vacuum panels, then installed 1/4" white plastic panels, well sealed with Life Caulk, as the new "liner." I also insulated the old lid with vacuum panels., one for each side. The box is smaller, but it was immense before. I then installed an OzeFridge holding plate system, which is a spectacular device. We only have a very small "freezer" compartment, but I can make ice. The whole system performed very well during 7 months in the tropics
 
Last edited:
I'm at line 48, completed, on my 60 line work list for this year alone, and I live 4 hours 30 mins away from the boat, but who knows, next year for a major fridge makeover?
I shake my head at the stuff in this Morgan sometimes... The original shower pump is disconnected and still sitting there under the sink. So I figured that when I take a shower, the water just goes in the bilge, and the main pump takes care of it. Or not. That water never gets to the main bilge pump behind the black water tank, and sits just below the mast base. So while checking for a 12 v feed for the new electric toilet, I switch the shower pump switch, and hear what I thought was the pump running, except now I see the wires are cut. Someone added a small bilge pump just forward of the base of the mast. I can just see it. And it pumps to some hose that I can only guess is the old shower drain. Seems to work, now I know to actually use it and not let that bilge area flood.
 
Funny, i was just thinking about the shower situation last weekend. The stock setup pumps the shower through a 3/8 hose all the way aft to the cockpit drain. Stupid as hell, and a never ending clog if you regularly shower. Long ago i plumbed it to the head sink drain. New pump in the stock location, it never clogs but fills the sink with dirty water.
The common setup on many boats is a shower sump. A box below the shower with what is basically a bilge pump and float switch. So you don't have to turn the pump on, its automatic.
The Morgan has a bilge area near the mast accessible from the head. Water from the speed paddle wheel when you remove it for cleaning ends up there. Its a very tiny passage from that to the main bigle. It also clogs, and I've had to clean it too many times. I now have a metal wire going through that hole, so when it clogs i just reach down and spin it.
Anyway, this past weekend i was thinking. That space could be turned into a sump. Just let the shower drain to it, and instead of the drain clogging, a sump pump can pump it out .
Just an idea. And it sounds like something like that might be going on on your boat.
 
Interesting....
So I think that little hole that drains the forward bilge must be clogged in mine. Somehow need to find it. But my water speed and depth sounder is in the aft bilge access, just above the main bilge area. The little bilge pump is sitting on its side down in there, I somehow need to situate it in there upright. I think the large hose from it is connected to the old 3/8" hose, so maybe need to see if it's getting clogged. Sigh... Another line added to the work list. I do shower every night while onboard, and that shower was a part of the attraction to the 382 for me.
 
You need a long skinny arm, and the hole can be reached from under the sink in the head. It's only about 1/8 in diameter, and you might cut your fingers feeling around down there on fiberglass shards. It isn't fun, which is why I left a wire in place to clear it when it clogs.

I do like the size of the shower. And since plumbing the drain pump to the sink, it works really well. I really recommend that for someone showering daily.
 
Hmmm. I have never had my shower pump out arrangement (back to the torpedo tube) clog up. I have a filter before the pump, however. Or perhaps I am just willing to stay dirty longer than you folks and take fewer showers.
 
At one time we decided to bring our cats along with us on a cruise. The litter box was kept on the floor of the shower. the cruise went well, the cats were basically happy, and the litter box arrangement seemed to work. That is until we went to use the shower. The litter that was kicked out of the box and was carried into the drain piping had solidified in the piping. Repairing that mess was a nightmare.

Jim
 
Our cats are non portable, and quite old, probably a good thing it seems.....
Back on board, trying to get the new Jabsco electric toilet done. I used 5/16 stainless Keenserts threaded into the base, as good as it gets for composite inserts. But removing the old 1.5" hose, oh what a job. Had to Dremel through the wires in the old hose then tear it apart to get it off. All that done at a little more than an arm's reach down through the laundry hamper opening.
The Jabsco uses a 1" outlet hose, they supply a 1" to 1.5" adapter with it.
All done and I wired it to the bathroom 12v supply. But it seems that breaker is too small for the necessary 15 amp needed to run the toilet motor. So no flushing toilet, so had to stay in a hotel tonight. So tomorrow morning I have to find a larger breaker, 25 amp is recommended. Maybe West Marine will have something.
 
Could hardly believe that the same breakers are still available, and at West Marine even. Only had screw terminal type, so had to trim them with a Dremel to make them into blade type. The original bathroom breaker was only 5 amp so no wonder it popped right away. So I bought a 25 amp for it. The wire from the breaker panel to the bathroom is huge, 10 guage, so no problem there.
And wow, this Jabsco electric toilet is the best $550 I have spent on this Morgan so far! And no stink anymore either. Push the button and done.
Sitting at a marina close to downtown Detroit now.
 
DGA, welcome to the Morgan world. These are truly incredible but under appreciated boats (by the outside world).
If you do a search for "Rudder wrench" I think you'll find our older threads regarding these and Prop shaft wrenches I made and provided to the group. If you're interested in a set, 3, I still have a few. Let me know. If need be, I'd ship them overnight or whatever you want.
I'll try to find the old thread...
Mitchell
I’ll take one 8132037104
 
The attached pic is of the galley aft wall, port of the engine side, back wall of the refrigerator. Excuse the mess of the original engine compartment insulation, I'm going to get to that soon. Does anyone know what the square 3/4" thick plywood piece does, and can I remove it... Somehow? I want to put a starting battery on that bulkhead, also supported on the hull, and that plywood piece makes it more complicated.
 

Attachments

  • PXL_20250712_205033417.jpg
    PXL_20250712_205033417.jpg
    4.8 MB · Views: 7
The attached pic is of the galley aft wall, port of the engine side, back wall of the refrigerator. Excuse the mess of the original engine compartment insulation, I'm going to get to that soon. Does anyone know what the square 3/4" thick plywood piece does, and can I remove it... Somehow? I want to put a starting battery on that bulkhead, also supported on the hull, and that plywood piece makes it more complicated.
I believe the factory battery charger was mounted there.
 
Thanks, I'll see if I can remove it in about two weeks when I go back, I see some screws, hope there is no glue. Will fabricate an aluminum angle lower frame with angled stays onto a vertical frame that I screw to that bulkhead, without drilling into the refrigerator. Two threaded bosses on the lower corners with longish stainless bolts to adjust and load against the hull bottom.
 
Back
Top