• Welcome to this website/forum for people interested in the Morgan 38 Sailboat. Many of our members are 'owners' of Morgan 38s, but you don't need to be an owner to Register/Join.

New owner, 1979 382 "Island girl"

I have four blocks leading back to the cockpit. I don't know what it has there now, but I think it makes sense, in order from left to right, run the main halyard, topping lift, first reef and second reef. So would be able to remember which line is which, aside from the colours of line, that I may forget in an emergency. Run them in order I would use them. Aside from the main halyard, these existing lines need to be replaced, all hard and moss covered, little left for identification colors either.
Does anyone recall the approximate line length for, say, the second reef line, which is probably the longest? I will cut these to the minimum length to reduce clutter after they are fitted.
Instead of the topping lift, run the boom vang back to the cockpit. The topping lift is rarely adjusted, but the vang needs to be released when raising the main, and put back on when the main is up. So it makes sense for it to be near the halyard.

I did as you, making my lines just long enough. It isn't. Err on too long over just right. halyard should be long enough to reach the water and still have a couple wraps on a winch. Jib sheets should be able to go from a winch, around the forestay, and back to the other winch. Reefing line length varies by the cut of the sail and how its rigged. The 2nd reef is longer than the first. Use some string to measure it. Consider making both reef lines the same length, so you can swap them if need be.
 
If you have a little time and can wait, I'm in process of replacing most of my running rigging. I'm away on vacation til later next week. I can get you the length and diameter lines I've purchased so far.

If you have or will have a dodger, I'd terminate most lines at the mast.

Our main, spinnaker, Vang, come back to the cockpit. With the dodger it's a pita to deal with main and reef lines from the cockpit. Can't get a full swing on winches, can't see what you're doing, and what's going on up top, which is important to me.

It's so much easier to go to the mast and raise/lower. Vang is OK, traveler is OK from the cockpit.

Just my opinion and experience.
Working at the mast also gives better awareness of everything else too. I'm sure others have other ideas.
Mitchell
 
I agree with everything Mitchell said. FWIW, on my boat i bring the vang and the Spinnaker halyard back.The vang because i adjust it while sailing, and the spinnaker halyard so i can release it quickly in an emergency.
 
Like Warren said! Vang and traveler should be readily available. Spinny too.

What I've found on Sonata, is she is vastly over-rigged for normal sailing. She was set up for bluewater, before we acquired her. Though that was part of the draw, sailing with all the extra halyards, staysail rigging, etc. on the bay is not needed.
 
Sadly, I only have one more sail date available for the year, and then Island girl has to go back to the yard, by October 1st, as that is the end of the dock lease for the season. I envy you guys that are in warmer climates and can feasibly sail all year!
So, was going to go back armed with everything I can for the rigging, and not even sure I can get a full day of work on her. And I still don't have 12V to the instruments or alternator, have not had a chance to diagnose what is going on there. But, as was said earlier, about removing all the lines and washing and storing them, maybe I shouldn't even do this now, save it all for May 1st, when the dock I am leasing opens again. I AM going to fit a new roller furler block and try that, if I get one more furler foul I may just jump overboard.....
Dave.

The other side of that coin is that for those of us with year round sailing, hauling out is a big deal. Yards are small and might not have room and time in the yard is expensive. Maintenance you can do every year, I might do once per decade. I am planning my next haulout, I am hoping to keep it to 2 weeks, and expect it to cost upwards of $15k. If I could work at a leisure pace over the course of a winter, or even the month before I space, the work wouldn't be such a big deal. Anyway, I would just enjoy sailing and put off everything until it's in the yard.
I have never washed my lines. I believe there is a benefit to getting the salt out of them, because salt is abrasive. But I wouldn't consider washing lines an important part of maintenance. If you wash them, I would just rinse them in a bathtub to dissolve the salt out. Using detergents will get them clean, and softener will make them feel nice, but both will damage the fibers, just like with washing clothes.
 
I'm hauling next week, and as Warren said, it's a big, expensive deal here. Bottom paint, seacocks to replace, maybe have the topsides polished, etc.
I'm hoping to be back in the water within 10 days. Otherwise it's going to get very costly. The yard will do all the work.

I have washed lines in the past, gentle cycle, no detergent. It seems to work well.
Mitchell
 
No salt here, so it's moss that grows on damp lines. $15k??? Oh crap, that's more than I paid for Island Girl! My haul out and winter storage is $1500, a tenth of yours, so I'll consider myself lucky. Not going to do any bottom work, and the boat hasn't had anti foul for awhile either. I'll need all winter, well, until it gets too cold to work, probably December and January at least.
I have plans to add a hydro vane or the like, need to get measurements so I can draw it in Solid works, all in my head right now.
 
$15k is what I estimate for new bottom paint (old needs removed as it is failing), new cutlass bearing, and a max prop.
Rates here are $650 to haul out, then about $50-$60 per day to be on the hard. Few yards (only one that I know of) allow you to work on your own boat. Labor rates are $125-$175 depending on the type of work. Replacing the cutlass is about a 2 day job, so $2000 in labor. Removing the old paint is many thousands of dollars, as that is a long slow job.
 
If you go with a Monitor, and I assume also a Hydrovane, call them and they have drawings and dimensions already. There is no need to work up your own plans.
 
Not sure if it is still available, but there is/was a monitor in So. Cal. for $1900. I was tempted for parts, as mine got hit in the marina. (marina's are the worst place for a boat imho) Costing me about $700 in parts to fit it.

Anyway, if it is available and you are interested, it would be worth the drive. $200 for a rebuild kit that includes all the plastic wear parts. The surface rust will easily polish out. There otherwise doesn't seem to be any damage. That would be $2100 for a $6000 windvane that steers better than a hydrovane. (with some other downsides, everyone has their preference of a vane)


I wouldn't ship it, just because anything bought over the internet you need to see in person and not blindly send money to a stranger.
 
If I couldn't work on the boat in the yard myself, none of this could have happened, so I'm grateful for that here. For the auto steering I intend to design and build my own version, bit of a project but it's the sort of thing I do, and I'm too cheap to spend $7k, and I want all the secondary mechanism hidden inside the hull, no lines around the helm area. So it's a hole through the transom, and make it all as tidy and compact as I can.
 
Dave,
For what it's worth, here are lengths and lines sizes and types I have recently purchased to re-rig. The lengths shown include enough line for an eye splices.

Jib Halyard, 115' MLX3 10mm this is terminated at the mast.
Spinnaker Halyard , 130' MLX3 10mm lead back to cockpit.
Staysail Halyard/spare Jib Halyard 115' MLX3 10mm at the mast.
Vang Control, (the vang purchase is on the solid sprung vang), 40' 3/8" Flightline, lead back to cockpit. The vang purchase is Dyneema single braid, 4mm I think or about 3/16".

I have yet to buy reefing lines yet but they will probably be MLX3 or Flightline. I don't have those measurements yet.
My mainsheet traveler is on the cabin top and lead back to the cockpit. I am going to use Dynamic Climbing rope there. I think it should be about 90' total, 8mm.

I have a bunch of other measurements on other running rigging if you need them. I will be buying more line in the near future. My boat has a lot of rigging. 2 Main halyards, 2 Sinnaker halyards, 2 Jib Halyards. Heavy weather jib halyard on a removable "baby stay", Boom Brake. The list goes on and on. I've already spent about $800 I think. Partly because I wanted to use Dyneema double braid for halyards. My intent is to strip the covers where not required. I want to reduce as much weight aloft as I can.
Mitchell
 
Thank you for that Mitchell. Amazing how much line is needed for the halyards! The only halyard I have going back to the cockpit is the main, the other three are the jib, which I have on the winch and the cleat, on the port side of the mast. I needs some sort of brake before the winch so it isn't tying that winch up all the time. The other two spare halyards are clipped off at a deck bar at the forward base of the mast, that the Spinnaker pole is also clipped to.
I have yet another rigging question. The main sheet traveller, just aft of it, someone added a second binnacle and frame. This frame mounts right behind the traveller bar, 382, remember. This frame is so close to the bar that the traveller stops won't clear it. So the main sheet block is restricted in it's movement to about 8" around the center. Any real advantage to somehow getting the traveller car to be able to go it's full length? Or is it easier to just adjust the vang instead? Not sure I know the full benefit of the sheet car adjustment.
Dave.
 
I don't adjust the traveler all that much. I do use the Vang, which is super powerful on Sonata. Both Traveller and Vang controls are essentially in the same place. The mainsheet is not that easy to adjust under our Dodger. So both Vang and traveller get more play.

On my 24' ULDB race boat, we play the traveller constantly upwind. Very often more than the mainsheet. But the boat only weighs 2000#. She's hypersensitive to any adjustments. Like a big dinghy.

I've only had Sonata for 4 years, so I'm not that knowledgeable sailing her yet. Others hopefully can fill in here.
Mitchell
 
Dana is a 382 with the mainsheet traveler in front of the binnacle. The traveler adjustment is our means of flattening the main as the wind picks up. The traveler that came with the boat could have been 3" longer on each side of the cockpit. That is 6" of control that we wish we had.

Jim
 
Jim, so you sort of use the traveller as a finer tuning aid for reducing sail twist, and the vang as a bigger adjustment?
 
Because the mainsheet on the 382 attaches to the very end of the boom, it exerts a good deal of pressure on the sail and does a very good job of flattening in rising winds. It also lets the sail belly out in light air when you move the traveller up to windward.

Jim
 
Dave, If your traveller car is obstructed, you might want to free that up to get the full range of the traveller.

Jim
 
When sailing upwind, the main sheet adjusts the twist (the vertical height of the boom), and the traveler moves the boom side to side. Once the shape (twist) of the sail is correct, you trim the sail if you change your course slightly by moving the traveler. Many people (including myself) get lazy and use the main sheet to trim the sail, but every time you touch the main sheet, you change sail shape. So, you compromise performance when you do that. And of course, they interact, so any adjustment of the main to change sail shape usually requires an adjustment of the traveler as well. As you start reaching and the traveler doesn't have the length to position the boom side to side, the vang takes over the job of holding the boom vertically, and the main sheet side-to-side.
 
Warren, that is a good explanation of function and use. I now just need more time sailing and to test and practice.
Jim, the traveller has about 8" of free travel before it hits the stops, inside the binnacle frame, and has no travel controls at all, aside from the two car blocks that hang off it. No track end blocks or anything. So I will have to buy all that at some point. It's also quite annoying when motoring with the sail down, the car bangs sideways into the stops constantly as the boom swings around.
Dave.
 
The stops should be movable, by a pin that lifts out of them. The track end blocks were an option, mine doesn't have them either, and they are no longer available. So to fix that, you need a new traveler :( That makes it very inconvenient and is why I get lazy and don't adjust the traveler often but cheat by using the mainsheet. It is a cruising boat, after all, so perfect trim isn't critical. When I raced a crew member was dedicated to main sail trim, and worked the traveler more often.

When motoring or in the slip, I take a spare line from the end of the boom to a winch, creating a triangle with the main sheet. The boom doesn't move then.
 
Came back last night from a very nice day of sailing on lake St Clair and then the next day, hauling out and the start of winterisation. I'm having withdrawal feelings already. So the off season work will begin, or continue I guess.
So I had time to study more of the rigging on the boom. In the attached pic you see a line coming out the top and the looping down and back past the gooseneck and out below. This is the first reef line. I was confused because it runs under a pulley in the boom and not over it. Is this set up to be a single line reef? If so, would I feed the tail of this line through the first reef eyelet and back down? Doing that, I would imagine there is some friction from the line passing through the eyelet when pulling the reef in, probably ok?
The four lines run back to the cockpit, I now know, the inner one is the main halyard, knew that, but the other three are all clipped off at the base of the mast, likely Spinnaker control lines. Both reef lines and vang and topping lift are all at the mast. I have little interest in trying to manage a Spinnaker by myself on lakes that the wind is constantly changing direction, and is very fickle, so will run the reef lines back instead. The upper great lakes can beat you up, so I need the quick ability to reef much more.
 

Attachments

  • PXL_20230919_193351555.jpg
    PXL_20230919_193351555.jpg
    2.5 MB · Views: 67
Last edited:
I replaced my galley spigots with a small unit by Moen. I had to do some readjustment for the piping, but not bad. Working under the sink is a bitch. Find a post from Mark Pearson, who installed a nice door on the bulkhead between the settee and the galley.
 

Attachments

  • WIN_20230924_10_05_53_Pro.jpg
    WIN_20230924_10_05_53_Pro.jpg
    2.2 MB · Views: 45
Came back last night from a very nice day of sailing on lake St Clair and then the next day, hauling out and the start of winterisation. I'm having withdrawal feelings already. So the off season work will begin, or continue I guess.
So I had time to study more of the rigging on the boom. In the attached pic you see a line coming out the top and the looping down and back past the gooseneck and out below. This is the first reef line. I was confused because it runs under a pulley in the boom and not over it. Is this set up to be a single line reef? If so, would I feed the tail of this line through the first reef eyelet and back down? Doing that, I would imagine there is some friction from the line passing through the eyelet when pulling the reef in, probably ok?
The four lines run back to the cockpit, I now know, the inner one is the main halyard, knew that, but the other three are all clipped off at the base of the mast, likely Spinnaker control lines. Both reef lines and vang and topping lift are all at the mast. I have little interest in trying to manage a Spinnaker by myself on lakes that the wind is constantly changing direction, and is very fickle, so will run the reef lines back instead. The upper great lakes can beat you up, so I need the quick ability to reef much more.

I'm not sure what that is. If it is a single line reefing setup, instead of just being a loop there, it would need to go up to the cringle and back down. I would be interested in a single line reefing setup, so if it can easily be done with the stock boom I would like to see it. What you might have is just a line that is run improperly. I would need to see it in person.
 
I'll get some detailed pics when I go back to work on her in a bit over a week. The line went under a pulley in the boom, and also has a guide that looks like it would help keep the line on the pulley as it heads up out of the top to the reef cringle. The line is like the rest, old and stiff, not used in awhile. I'm sure Island Girl was used in fair winds and the reefing systems haven't been used for many years.
 
The stops should be movable, by a pin that lifts out of them. The track end blocks were an option, mine doesn't have them either, and they are no longer available. So to fix that, you need a new traveler :( That makes it very inconvenient and is why I get lazy and don't adjust the traveler often but cheat by using the mainsheet. It is a cruising boat, after all, so perfect trim isn't critical. When I raced a crew member was dedicated to main sail trim, and worked the traveler more often.

When motoring or in the slip, I take a spare line from the end of the boom to a winch, creating a triangle with the main sheet. The boom doesn't move then.
I love having the main sheet in the cockpit with 6/1 purchase. I still use the old Nicro traveller on my 382, although I had it reanodized. Warren: Garhauer makes and sells a system of 4/1 blocks you can mount just outside of the old traveller and to the traveller carWIN_20230929_15_19_47_Pro.jpg. Makes life much easier. Check it out. On the vang, I still use a rope vang, not one of the fancy metal ones. I have to go forward to adjust it. How do you run the control line? Just across the cabin top and under the dodger? I would have to drill or cut thru my water break at the bottom of the dodger to get it back to the cockpit but I may look in to that.
 
When it comes time to replace my traveler, its going on the cabin top. I've nearly died from it hitting me. I might have even been knocked unconscious on one occasion but there was no one there to tell me how long i was down. Its far too dangerous where it is. You can still have the sheet brought back to the helm for single handing.

I'm not going to invest any money into what i have before then.

I don't have a dodger, so i don't have that issue. But the line for the vang goes to the mast, then to the port side through a pair of deck organizers (blocks) along with the spinnaker halyard.
 
That pic of your traveller Terry, is good, I can make something work with that, I just have to bend the binnacle frame to make it clear the car and stops.
Been working on my "Wind guide" design lately, have some major mechanism issues figured out now, just need to get all my carbon fiber paying work completed so I can spend more time on it.....
 
When it comes time to replace my traveler, its going on the cabin top. I've nearly died from it hitting me. I might have even been knocked unconscious on one occasion but there was no one there to tell me how long i was down. Its far too dangerous where it is. You can still have the sheet brought back to the helm for single handing.

I'm not going to invest any money into what i have before then.

I don't have a dodger, so i don't have that issue. But the line for the vang goes to the mast, then to the port side through a pair of deck organizers (blocks) along with the spinnaker halyard.
I had the same shot to the head experience and went to the cabin top early on.
I repurposed the OEM Lewmar 43's to the coach roof and double ended the main 4:1 with a high tech free flowing sheet.
Similar set up to Catalina. Quick to trim manually and enough power to tighten everything up. Being able to adjust from either side is wonderful.
 
I'm hauling next week, and as Warren said, it's a big, expensive deal here. Bottom paint, seacocks to replace, maybe have the topsides polished, etc.
I'm hoping to be back in the water within 10 days. Otherwise it's going to get very costly. The yard will do all the work.

I have washed lines in the past, gentle cycle, no detergent. It seems to work well.
Mitchell
Which yard are you going to?
 
I
I'm hauling next week, and as Warren said, it's a big, expensive deal here. Bottom paint, seacocks to replace, maybe have the topsides polished, etc.
I'm hoping to be back in the water within 10 days. Otherwise it's going to get very costly. The yard will do all the work.

I have washed lines in the past, gentle cycle, no detergent. It seems to work well.
Mitchell
I'm off to KKMI first week of November.
FWIW: I have been using Trinadad SR cut 100% (3-quarts T-10 and 1-quart Penetrol) I haul every other year. No build up and rolls on pretty smooth
 
John, do they allow you to do some of your own work there?
I just got Sonata out if hock this past Thursday. Spaulding Marine Center, Sausalito.
Let me know if you'd like to meet up, I'm around the corner, nearly.
Mitchell
 
Mitchel,
KKMI has been referred to as an organized criminal conspiracy by others.
No owner work is allowed. They used to let me paint but no more. They do let me grease and service my prop.
The yard is squeaky clean and you get a bottle of wine to help the agony of the statement..
If you are aboard this weekend or Monday we could hook up.
510-719-0227
 
Wow! I thought they did allow work after they prepped the bottom.
Things are outta hand these days. Spaulding was going to charge $143 to drill 2 holes, told them I'd manage it. At least you get wine.
I'm flying out this evening to Maine to look at another boat. I don't return til Tues evening.
I will be back down 10/12 for several days though. Maybe then?
 
I once sailed with a guy who had 2 identical boats. One on each coast and as his story goes, his wife never caught on.
Great plan, eh?
 
Anyone hauled out in Napa? I'm leaning that direction. Supposedly cheaper then KKMI, and allows DIY.
My last haul in the bay area was in 2016 right after I bought her, at Spaulding. They allowed DIY (not sure if they still do), and the cradles they use were tall enough I could drop the rudder with know issue. But, the crane scared me. I seemed the boat was near the limit of it's capacity, and the was an operator error that caused contact between the crane and my backstay. I'm not sure I want to take that risk again.
 
We looked at Napa, be wary of their individual item cost. When I estimated doing the work my self there, i seemed as much as anywhere else. Without my doing my own work. YMMV.
We hauled at Spaulding about a week ago. DIY is NOT allowed any longer. Bottom paint and polishing topsides. I had some issues with them. We can talk off forum about my experience if you'd like.
I had Bay Marine, next to KKMI do paint in 2019. I was quite happy there.
Mitchell
KKMI 12/4/23. $2750 1 coat Trinidad HD. 2nd coat maybe free
 
My bottom is in really bad shape, and needs to be stripped back to the gelcoat, then start over. KKMI estimated $8000 labor for that alone. I know there a a risk to damaging the gelcoat, but if i got day labor from Home Depot $50 an hour i would be 1/3rd that. And they would work their ass off and slouch.
A friend of my a few years back diy'd at napa using a chemical stripper. A lot less labor intensive, and he saved thousands of dollars. I'm also looking into soda or walnut shell blasting. Completely strips the bottom in hours instead of weeks.
 
So I am looking at buying blocks and cleats for my 382 boom end traveller. The car has two single pulley blocks on it. This would mean it had, possibly from original, a 2:1 system on it. So I would buy two cheek mount single pulley blocks, with beckets. I would rather keep the setup minimal if possible. At 2:1, will this be a lot to pull by hand against a loaded main sail? And, was a 2:1 the original setup? It obviously will have a lower load than a mid boom attachment as the 383/4 would have I guess.
 
Look at Garhauer. I use their 4/1 system. You need to decide if the old track and car are still working well . Mine is, altho I had the track soda blasted and reanodized. Better yet, Garhauer will build you a whole new system, with a better track and car, and match the mounting holes of your old track. They provide great stuff.
 

Attachments

  • WIN_20230929_15_19_47_Pro.jpg
    WIN_20230929_15_19_47_Pro.jpg
    2.6 MB · Views: 40
Thanks Terry. My traveller seems to roll fine and the track looks to be in good condition. I think the last owner screwed up and mounted the additional binnacle frame too close to the traveller ( it can't pass the frame, hits it) so, like everything else on this boat, said screw it, and removed the end blocks and lines, and slid the stops to the middle.
Trying to not spend a ton of time and money on it, so many things to do that on still, so will make what I have work if possible.
 
I'd 2nd Garhauer gear. Absolutely beautiful and top notch on everything I've come across. Our ridged Vang is one of theirs as well. And if it's ever possible for marine equipment to be fairly priced, they are.
 
I'm not sure what that is. If it is a single line reefing setup, instead of just being a loop there, it would need to go up to the cringle and back down. I would be interested in a single line reefing setup, so if it can easily be done with the stock boom I would like to see it. What you might have is just a line that is run improperly. I would need to see it in person.
Warren, I have attached a pic, the view is from above the mast end of the boom, looking down at the 1st reef line loop. I will have to pull the line out of the deck turning block and mast base block and feed it through the 1st reef eyelet when I put the mainsail back on. Buying all new lines for this anyway so will attach the new line to the old one and drag it through.
 

Attachments

  • PXL_20231031_155151171.jpg
    PXL_20231031_155151171.jpg
    1.7 MB · Views: 29
Warren, I have attached a pic, the view is from above the mast end of the boom, looking down at the 1st reef line loop. I will have to pull the line out of the deck turning block and mast base block and feed it through the 1st reef eyelet when I put the mainsail back on. Buying all new lines for this anyway so will attach the new line to the old one and drag it through.
That does not look like the factory end to the boom. Original did not have a sheave exiting the top of the boom. Original was that the cringle (ring) of the sail attached to one of the hooks there in the picture. No lines were involved at the mast end of the boom.
Having a single line reefing setup is a slick upgrade if you can make it work well.
 
Attached another pic, this is a large inline fuse holder that is the alternator feed wire, and was the source of my electrical failure two months ago. It had an SC60, 60 amp fuse in it that was blown. All cars and trucks I have ever worked on have a single, dedicated wire straight from the alternator, directly hooked up to the battery positive terminal. This does not, it goes to the starter main terminal, so I hadn't looked at that. I removed some accessory electrical equipment during my search, it had a Loran alternator filter, don't need that anymore, ( still need to get rid of the Loran itself...) and a big old battery charger that I am replacing with a modern two bank smart charger.
Clearly, the alternator was outputting more than 60 amps, I had ran the main battery down overnight and the alternator was working hard to pull the battery back up, and it blew that fuse. 60 amp is the biggest available in an SC type, so I will get some spares.
 

Attachments

  • PXL_20231031_205616754.jpg
    PXL_20231031_205616754.jpg
    2.5 MB · Views: 26
60A is probably adequate for whatever alternator the engine had originally. The alternator has certainly been replaced at sometime in the last ~40 years. It is common on stock installations for the alternator lead to go to the starter, and then on to the battery, just to simplify installation with only one main cable from the engine to the battery. It is also common to change that and run a separate wire from the alternator directly to the battery. If you are blowing fuses, you might consider a larger wire direct to the battery. Strictly speaking, that wire does not need a fuse to be acceptable. Of course, a fuse is better than not, and the fuse should be near the battery end of the wire, not near the alternator. In the event of a short circuit, it is current from the battery that needs to be stopped by a fuse, not current from the alternator.
 
I have been working on getting the traveller working again lately. The traveller car was trapped between the add on binnacle frame, mounted too close so it couldn't pass the tube legs. So I cut that and added some bends so it will clear it, in the pic. All the traveller end blocks were gone, only rubber end caps, and the two adjustable stops. So I drew up and CNC machined new end block mounts. I angled the cleats towards the center of the helm area, see if I can trim the main sail while still seated.
 

Attachments

  • PXL_20231105_231042470.jpg
    PXL_20231105_231042470.jpg
    3 MB · Views: 22
  • PXL_20231129_232846658.jpg
    PXL_20231129_232846658.jpg
    3.2 MB · Views: 21
  • PXL_20231129_232919163.jpg
    PXL_20231129_232919163.jpg
    1.9 MB · Views: 26
I have been working on getting the traveller working again lately. The traveller car was trapped between the add on binnacle frame, mounted too close so it couldn't pass the tube legs. So I cut that and added some bends so it will clear it, in the pic. All the traveller end blocks were gone, only rubber end caps, and the two adjustable stops. So I drew up and CNC machined new end block mounts. I angled the cleats towards the center of the helm area, see if I can trim the main sail while still seated.
Nice work! Pretty crafty.
Mitchell
 
While working on the design for my wind guide, I am trying to figure the water and air paddle sizing. On Island Girl, when pointing close to the wind with a 150% Genoa, I had considerable weather helm. I am over the 150, above 7 or 8 knots of wind the boat seems overpowered. So I will use the jib I have, it's about an 80% I believe.
So, will the weather helm be reduced with that sail, over the 150?
 

Attachments

  • PXL_20231207_195141769.jpg
    PXL_20231207_195141769.jpg
    6 MB · Views: 15
  • PXL_20231207_195114785.MP.jpg
    PXL_20231207_195114785.MP.jpg
    9.4 MB · Views: 21
On the Jib, my first guess is that changing job size will make some, but not a huge difference in weather helm. Most likely your main is trimmed too tight. Ease the main until it starts to form a bubble at the luff of the sail. Then trim in until that bubble just barely goes away, and no more. Some weather helm is needed to sail effectively at close angles. The correction you give against weather helm gives the rudder lift to counter leeway and the boat being pushed sideways more than going forward. If you trim out all the weather helm, you might feel like you are sailing close to the wind ( 30 degrees apparent or so ) but if you look at your track on a GPS you will be going sideways, and your true sailing angle to the wind will be closer to 80 degrees, mostly not going forward at all.

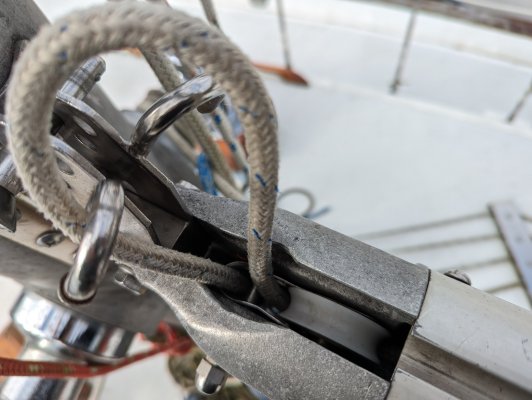
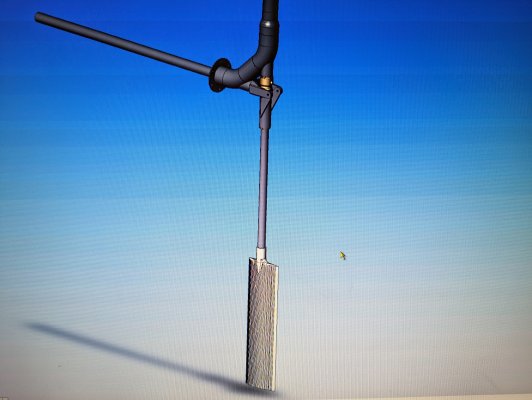
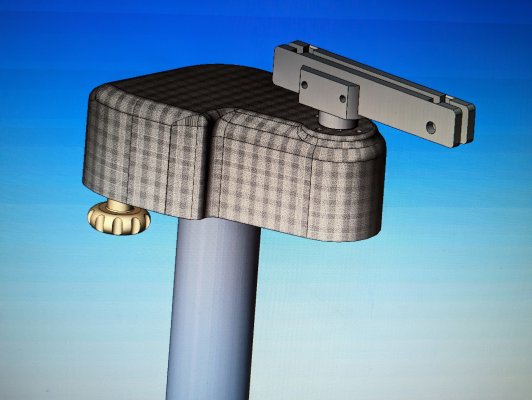
It looks like you are building a servo pendulum type windvane, not an aux rudder?

In either case, there is a significant issue. The mount for the airvane you have is horizontal. It needs to be at an angle, Looking at my monitor (but not measuring) it is about 30 degrees. Giving that an angle will cause the airvane to rotate slightly as it moves. So, if you are off course by only a small amount, the vane will move a small amount. As it moves, the angle of the vane will match the angle of the wind, and then hold in a mid position, instead of flopping all the way to one side. Further, the mechanics are such that if the airvane moves 10 degrees to one side, the water vane will only move 10 degrees, because as the watervane moves it also turns. So having moved 10 degrees, it will have turned to be straight again.

If you don't build those mechanics into the vane, then if you are off course even 1 or 2 degrees, the airvane will go hard over to one side, and the corrections will be to turn the rudder hard over and the boat will grossly over correct. The result is the boat will sail in a wild S course instead of holding a line. I have seen this a few times on vanes that were home built. Windvane steering is simple in principle, and looks simple at a glance, but with a study of them there is a lot of work and engineering in tweaking those angles and mechanics.

Here is a video of my monitor steering in about 30 kts, and 4 meter waves. I am filming from below decks looking up, so you don't see the swell. Notice how calm the steering is. The air vane and wheel are both moving mostly very slowly. The vane is often close to vertical, and the wheel rarely makes more than a 1/4 turn. With out the mechanics I described, the wheel airvane would go from hard over one side to hard over the other side, the wheel would spin wildly, and in the 4 meter waves the boat would probably crash.

Also, because of those mechanics, the size of the vanes isn't as critical. If the airvane is too small, it won't work in light air. But if it is too large, then it doesn't cause any issue, only it's less convenient. Same with the underwater paddle. Too small and it won't work at slow boat speeds. Too large and it will still work fine, but will cause excess drag.
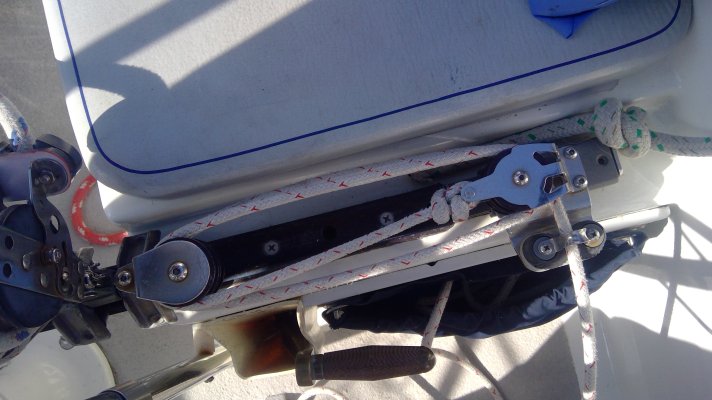
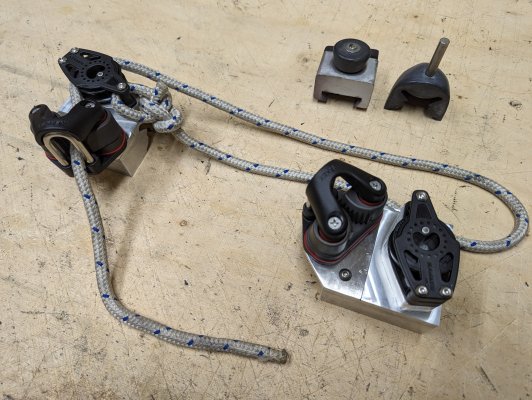
 
Thanks Warren. This is a water vane, air paddle type. I have studied many types, this one is different in that it does not use a pushrod ( or rope!) to transmit the wind paddle motion down to the water foil, but a driveshaft. So what you see on the top is a horizontal rotating paddle mount. I know, it is different. It uses reduction gearing of 5:1, max wind paddle is 50 degrees each direction, water foil max 10 degrees each way. Drives through the transom mount to an actuator arm above the quadrant, and a motion disconnect on a push pull cable and knob just below the helm seat to engage. Spring loaded water foil in case of hitting an underwater obstruction, and also to stow out of the water when not in use. I have designed in a lot of capacity for gearing change to tune it. Also has ability to be a low power electric autopilot, but I won't add that at first.
 
Dave
How old is the 150%? Years ago when we first brought Dana, our 382, she came with a 150% genoa. The sail looked and felt in good shape but in reality it was blown out and porous. Sailing upwind with it we were going more sideways then forward. Going for a new sail, our sailmaker suggested going with a 130%. It was like sailing a new boat! Have a merry Christmas.

Jim
 
Dave, good luck with the vane creation. As Warren says, the design must be precise to work well.
May I suggest that you start new threads for each topic. This thread now has a dozen or more.
 
Both the 150 and the jib are fairly new. Seems soft, no damage, not faded etc. the main however, is really old, hard to flake, needing a repair or two. I am wondering if I can have the 150 cut into a 110 or something useable.

Good point on the new topic, I'll start new with different items.
Dave.
 
Dave
Softness in a dacron sail is not always a good thing. For a sail to maintain a pressure difference between the high pressure inside and the low pressure outside, it is treated with a chemical that makes the fabric non-porous. As a sail gets older, that chemical begins to disappear. While the sail may still look good and feel soft, it may be on its way out. As to recutting a sail to a different shape, We had a mainsail that split down a seam in a blow. The sailmaker looked at it to make the repair but said we would be throwing good money away on a sail that would eventually fail again. He built us a new sail. It was good advice.

Jim
 
If I had to guess, the jib and 150 are maybe 5 years old, and the main, at least 25? One indicator, the 150 is a pain to tack, always have to drag it around the front shrouds, and over time that will take it's toll. There is almost no indication of any wear from that. On the main, I have had thoughts on having a new one made, any guesses on a price?
 
If I had to guess, the jib and 150 are maybe 5 years old, and the main, at least 25? One indicator, the 150 is a pain to tack, always have to drag it around the front shrouds, and over time that will take it's toll. There is almost no indication of any wear from that. On the main, I have had thoughts on having a new one made, any guesses on a price?
You should be able to figure a way to not have to drag the sail around the shrouds. If you hold off your release until the jib is backwinded with a lot of pressure, then release quickly, it should blow through unless the knot of the clew snags on something, or if the line doesn't run free.

Sail prices vary quite a lot depending on quality and options. I spent about $1800 in 2020 for a new main, on the low end of quality. It's fine, but won't last as long from UV etc. In 2016 I bought my previous main for about $3200, which was better quality, but still not a high end racing sail. Time will tell the difference. I was rather disappointed in the sudden failure of my $3200 sail after only 4 years, but it did have 20,000 nm on it. I would have expected a new sail to last a circumnavigation, however. I wasn't planning to replace it before I got home.

One note though, I did not replace the sail cover in 2016. Even if they look ok, after 5-7 years, they no longer protect from UV. It was the leach of the sail that sits on top when flaked on the boom that failed. So, ALWAYS replace the sail cover when you get a new sail.
 
Thanks Warren. This is a water vane, air paddle type. I have studied many types, this one is different in that it does not use a pushrod ( or rope!) to transmit the wind paddle motion down to the water foil, but a driveshaft. So what you see on the top is a horizontal rotating paddle mount. I know, it is different. It uses reduction gearing of 5:1, max wind paddle is 50 degrees each direction, water foil max 10 degrees each way. Drives through the transom mount to an actuator arm above the quadrant, and a motion disconnect on a push pull cable and knob just below the helm seat to engage. Spring loaded water foil in case of hitting an underwater obstruction, and also to stow out of the water when not in use. I have designed in a lot of capacity for gearing change to tune it. Also has ability to be a low power electric autopilot, but I won't add that at first.
It sounds like an interesting design. So the paddle is going to be horizontal instead of vertical? How high will it be? I assume elevated so it isn't sweeping the cockpit when sailing downwind.

You obviously have some 3d modeling experience. Will you be 3d printing any mockup parts? It might be worthwhile to have a 1/4 scale model built from plastic to get the kinks worked out.
 
Sometimes a tack goes better, but in general there is always some of the 150 touching the shrouds. I considered adding some nylon tubing to the lower half of the front shrouds to protect the 150, but as I said, I'm over that sail and will use the nice jib I have and see about cutting the 150 down to something useable.
Yes, the air paddle rotates in a vertical axis. It is angled upwards some to give the leading upper edge some low pressure side a vortex. Will add a mass balance forward of the pivot to help keep it on track when the boat rolls laterally. One goal is to have zero ropes, lines, controls intruding into the cockpit, only an engage/ disengage knob. Trim is up under the head.
I have half of the parts ordered or in stock now, need to finalize the design and get the rest.
 
I'm adding a 40mm block to the first reef point on the main sail, trying to reduce friction so the single line reef setup works well, I hope. See the attached pic, the luff of this main has another line attached for the lower 12' with the slides attached to that, and I'm not really sure what that feature is for.
 

Attachments

  • PXL_20240129_163806689.MP.jpg
    PXL_20240129_163806689.MP.jpg
    7.2 MB · Views: 12
  • PXL_20240129_212743331.MP.jpg
    PXL_20240129_212743331.MP.jpg
    5 MB · Views: 10
It isn't uncommon to use a block to make single line reefing work better. One of the downsides with single line reefing is that it is difficult to make work well.

I'm not sure about the other line. Maybe some type of Cunningham, used to reduce the draft of the sail. Ease the line and the sail gets deeper, and trim it for a flatter sail. But I have never seen one like that.
 
I wonder if that luff line is to make the sail reef easier; it might flake without assistance if the slides don't drop to the bottom easily.
 
Back on board Island Girl for a two day work slog.
Got my new traveller end blocks fitted, will work well I think. In the attached pic, among all the spare lines under the helm seat, I found this line and block setup. Large line, 1/2", wondering what it could be used for, hoping I could somehow use it for a boom preventer? Not sure where it could attach on the deck, there are some eyes on stanchion bases maybe.
 

Attachments

  • PXL_20240315_174003624.jpg
    PXL_20240315_174003624.jpg
    2.8 MB · Views: 5
It looks like a boom vang. If you have another boom vang, maybe this is the old one. Do not try and use it for a preventer. It will rip the stanchions out of the deck, and if you use a strong point like the genoa track you risk breaking the boom in half.

A preventer must go from the end of the boom, all the way to the bow, then all the way back to the cockpit, and should be on a winch. Being on a winch allows you to get it really tight, and then also allows you to ease the main over when it backfills. If on a cleat then you lose control of the main when you release it under load.
 
I have a functional boom vang, don't think it was used there. Possibly then for the jib/ Spinnaker pole control? It has the type of connector ends you can release under load.
 
Nope, nothing to do with a spinnaker or pole. It's far too heavy duty. My Vang is exactly like that, even with the snap shackles. If your vang is better than this, then this is probably original, and was just tossed in a locker when it was upgraded. Or, it could just be something on board for utility. I have one similar (but smaller line) that I use with a halyard for lifting heavy items on board. For example, to lift my dingy out of the water onto the foredeck.
 
Back
Top