

You are using an out of date browser. It may not display this or other websites correctly.
You should upgrade or use an alternative browser.
You should upgrade or use an alternative browser.
Water Tank O-Rings
- Thread starter datswite
- Start date
jimcleary
James M. Cleary
Ken
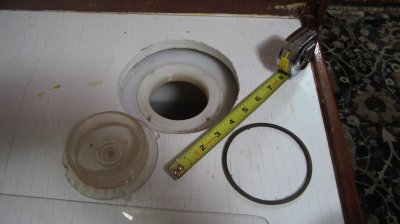
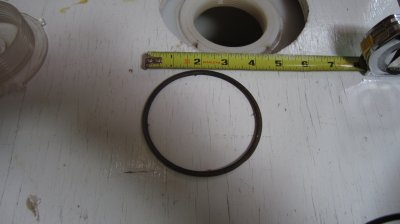
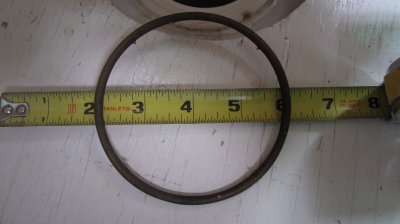
At the boat last night. No wind, no sail! The o-rings for the water tanks are 4" OD x 3 5/8" ID x 3/16" diameter. Mine are the original so I don't know where to find replacements. At the beginning of each season I rub a little Super Lube on them to keep them soft. Seems to work.
Jim
At the boat last night. No wind, no sail! The o-rings for the water tanks are 4" OD x 3 5/8" ID x 3/16" diameter. Mine are the original so I don't know where to find replacements. At the beginning of each season I rub a little Super Lube on them to keep them soft. Seems to work.
Jim
john Gonzalez
Member
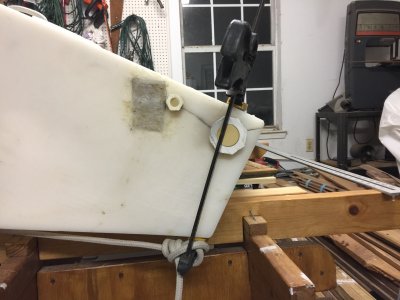
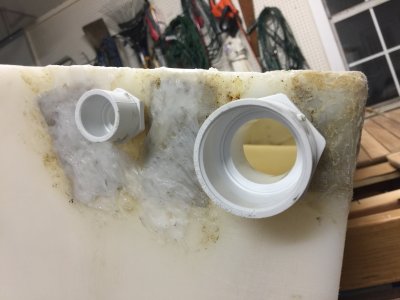
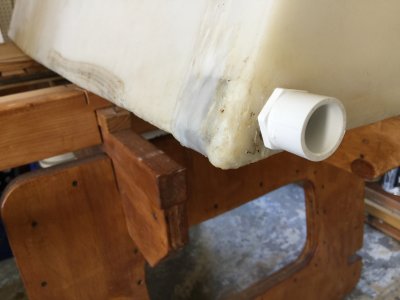
Picking up on this thread as it deals with the water tank. I discovered my tank has a crack at the inlet connection and also the vent connection. That is high in the thank and so I can partially fill it but if the boat is on a heel, water will surely leak out. I found the crack when replacing my hoses in the boat. I am trying to figure out how to seal this without removing the tank. I can see the tank crack from the narrow locker where the inlet fittings are. I have run a camera with my cell phone and taken pictures in the tank and all looks good except the inlet area. As you know, there is a small area cut out of the wood enough to see it from the narrow locker where the hoses are. I would like to repair the tank vs. replace. So the problem is how to get to it to repair it or what to use to seal the crack. 5200 does not adhere to plastic, neither does epoxy. So, I am going to cut an opening to remove the tank entirely and plastic weld the crack to seal it, if not successful then I will have to replace it $$$. This repair would require that I remove the tank. If I cut the wooden seatee bottom out, is the tank loose inside the compartment or is it somehow glued in so that removing it would lead to damage to the tank. Has anyone done this? and has anyone repaired their tank some other way?
stnick
lee nicholas
John are you talking about your Starboard side water tank ? Mine was corner cracked. outside corner. I cut the top off that Starboard side water tank seat ! stay on the edge the tank it self in in a fiberglass tub ! which is good. I used a SS hinge across the back and screwed back down after repair . West Epoxy makes a G flex. Made special for poly tanks and such. Rough it up you can even use glass cloth. Or take it to a tank maker and he will seal that end and replace the drain. I used a vibrating cutter , as long as you stay along the back edge 3 inches you will be fine. 3/4 deep plywood just cut a hair deeper on all 3 sides and unscrew the front . Good luck
jimcleary
James M. Cleary
John
I have the same crack at the inlet fittings on both port and stbd tanks. When Morgan installed the threaded inlet fittings, they didn't thread the plastic of the tank. They just jammed the fitting in place. Over time the stress of that jamming cause the crack. With the inside of the tank completely dry, I wiped the area around the fitting with lacquer thinner, then spread 5200 into and around the crack from inside the tank. Let it dry a long time. It has been holding for over 10 years. Sure beats doing surgery on the cabinet work or buying a new tank. If they start leaking again, I'll do it again for another 10 years worth.
Jim
john Gonzalez
Member
Thank you Lee and Jim. At the point of the crack, starboard tank, I cannot get my arm into the screw top opening of the tank deep inside enough to be able to clean that area or glue anything that deep into the tank where the crack is. Could I do that from inside the narrow cabinet locker? just cut a opening in the side of the locker enough to expose the crack. I need to be half my size to get into that cabinet locker to be able to work in there? I think that is the only way I can get my hands at the crack location to fix it.
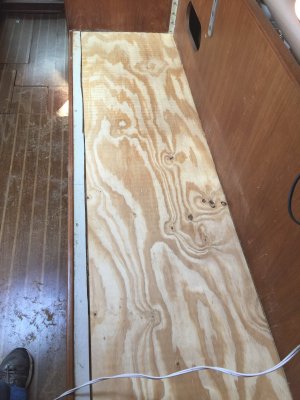
Lee, on the front of the seat, I put new teak plywood there, I glued it in and so I don't think I want to try to take that out. it is there for good. If I have to take the tank out, can it lift up from the top? Not heard of G Flex. I will look that up on the web. Sorry to bug you two again on this.
Lee, on the front of the seat, I put new teak plywood there, I glued it in and so I don't think I want to try to take that out. it is there for good. If I have to take the tank out, can it lift up from the top? Not heard of G Flex. I will look that up on the web. Sorry to bug you two again on this.
tfrere
Thomas McNulty
My port water tank was cracked and leaked badly. I took it out to bring it to a plastic tank company for repair. They didn’t want to touch it. So, I had a new tank made out of aluminum.
As Lee said the tank sits in a fiberglass mold. It fits perfect. The guy that made my aluminum tank got it about 1/8” too long and it wouldn’t fit. I had to cut the end of the mold to make it fit.
I contemplated cutting out the cracked fitting and installing a bulkhead fitting to cover the crack but after I got the tank out I realized the crack was worse than I thought. It really was not very hard to get the tank out from the top.
Good luck. I can get you in touch with the guy that built mine if you’d like.
john english
Member
Both P&S tanks cracked about 20 years ago. pulled them out and to them to a plastic tank company. Been good since. Polyethylene tanks are hot air welded. Eastwood and Harbor freight have welders should you want to try a DIY.
john Gonzalez
Member
Thank you for the replies, seems to be a common problem with plastic tanks after this many years, I agree with Jim that the fitting is not screwed in as it turns in the tank with a little pressure, so I wonder how water tight that would be. I will survey the problem more on this tank particularly that any glue patching needs to be done from within the tank. Let you know once a make a call on this. I am very handy so I may try to plastic weld it if I can get it out with only cutting the top.
stnick
lee nicholas
Yes the tank can lift right out the top Ill go to the boat today and remove the four front screws and lift the hinged top off and take a pix for you .
If you have one of those harbor frieght vibrating cutters 30 dollars they can cut that front seam so you will never even know. On the back you can use a circular saw set at 3/4 deep Honest . Right against the back you will miss the tank and tub by 4 inches. Plenty of room HONEST jig saw for the corners !Ill pix it .
I have a Pond in the back yard upper and lower spill pond after 10 years the bottom started to loose water. Last week i drained it Went to Worst marine purchased some G flex ,
mixed it up harderner and resin and put it over new cloth fiberglass patch when dry two days I used That black liquid rubber in a can. Third day now no water leaks.
That G West system G flex is special made to hold on the plastic and poly ! Trust West System ! sure would be nice to seal from inside also.If you cant get to it, add another 4 inch access so you can reach it . Only a Port with a Gasket !!
When i cruise , i carry in spares, tank patcher just in case.
Last edited:
jose santin
Member
Ken,
I just ordered replacement o-rings. This is the link:
http://www.theoringstore.com/index.php?main_page=index&cPath=367_16_19&sort=2a&page=2
I just ordered replacement o-rings. This is the link:
http://www.theoringstore.com/index.php?main_page=index&cPath=367_16_19&sort=2a&page=2
john Gonzalez
Member
Thank you Lee, Jim and others for your input. Great ideas. I will call this: Project Christmas Break!!
john Gonzalez
Member
Yes...as seen on TV! Kidding aside, however, I was thinking about that flex seal tape!
bob_mcdonald
robert mcdonald
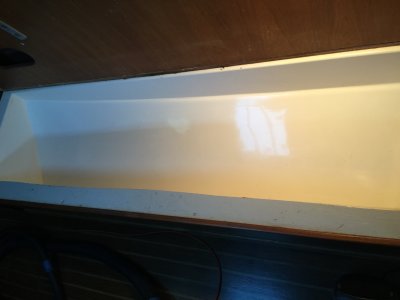
I also did the cut-out of the stbd. tank 3 years ago. I cut as close as you can to the outside edges as possible with a skil saw and in one location with the multi-tool (vibrating blade). Once the top is off, the tank lifts right out of the fiberglass tub it sits in. I kind of wondered why Morgan didn't make a removable fiberglass top for the tub and call it a tank - the tub is beautifully made. Any way I took the tank to a company called Dura Weld in Riviera Beach (West Palm) as I keep the boat in Florida during the summer. They cut the entire stern end off the tank and fabricated and welded in a new one with threaded fittings, then pressure tested it, all while I waited, for $100. One note of caution. When I put the top back on I screwed on 1 1/2 x 1/8 aluminum bar stock around the entire perimeter of the plywood top and then screwed this to the uncut portion of the seat. I think I used about 40 or more screws as I probably will never remove the top again. Remember the tank when full weighs 500 lbs - if you were ever rolled on your side that kind of weight could easily pop a top held only by a couple of screws.
john Gonzalez
Member
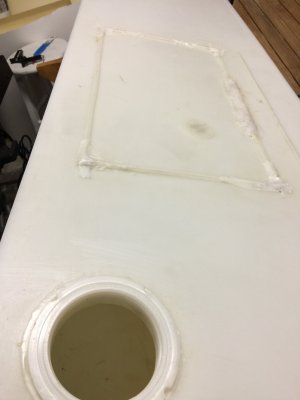
I could not find a company or person to plastic weld and fix the cracks in my water tank so after youtube and some practice, I repaired it on my own. I put more plastic than what was necessary but I do not plan on doing his again. By the way, the testing it, the factory welding leaked some too. But the process is not hard to do... It was also not hard to get the tank out. You will need another person. It is a tight fit. Where it sits is beautiful gelcoat. Sure wished the outside gelcoat looked like this. Well, anyway it is not pretty but it does not leak. I cut a piece of wood for a dry fit and will be putting it back in this weekend. I will paint the non-marine grade 3/4" plyboard will oil based paint to seal it. Then I will glue and screw it on.
Attachments
Share: