• Welcome to this website/forum for people interested in the Morgan 38 Sailboat. Many of our members are 'owners' of Morgan 38s, but you don't need to be an owner to Register/Join.

Repair of water damage to house sides teak veneer

captpete

Member
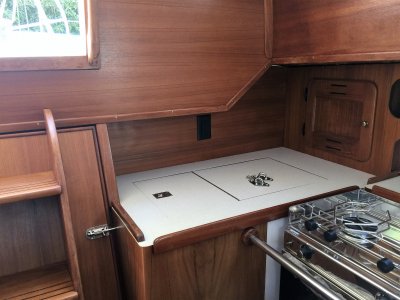
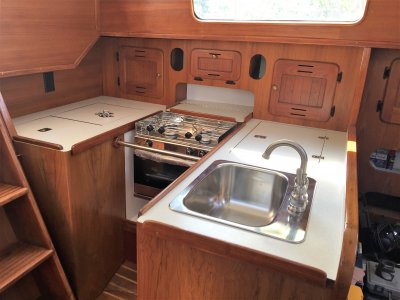
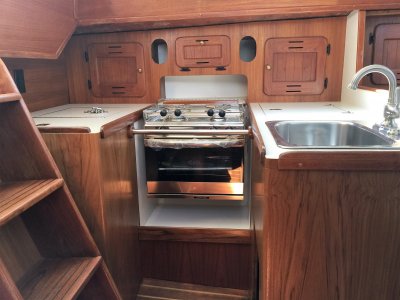
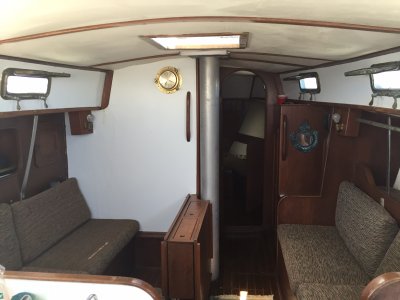
My old girl came with water damage to house sides and even main bulkhead from leaky ports. The leaky ports were replaced. But the damage remains. See pics.

I have seen some awesome examples where folks have converted some or all of these sections to white paint and/or white man made material.

So I am looking for thoughts on best way to go and recommendations for materials to consider using.

My options at this stage are (noting my interest is in simple to start so we can spend time using the boat):

1. Sanding surface, especially where varnish or whatever coating is on there has lifted, filling in with some kind of wood filler where veneer has been damaged, and then painting.
- what types of paint would anybody recommend?
- including gloss, semi gloss, flat?
- what type of wood filler?

2. Removing the panels and replacing with some type of man made material panel.
- What types of panels have folks used?
- What thickness?
- Where purchased?

I am thinking at this stage I prefer to take the first approach of painting as it seems like it might be easier and quicker (especially since i can mostly get the work done by junior...and also when it comes to main bulkhead). Then if it isn't satisfactory I could go the second route at some point in the future.

Looking for an economic solution, not looking for perfection, and, again, not wanting to be involved in a project when I would rather be sailing.

Thanks in advance for any input you may have.

Peter
 
Last edited:
Peter, one structural concern is the condition of the back side of the bulkhead where the chainplate attaches. The backside of the lamp box (upper left, port side) can be accessed through the head cabinet. You have to dig a bit to see it. A head port leak can deteriorate the plywood on the backside of the chainplate. Has it been checked out thoroughly?

I was able to refinish the port paneling with urethane after a light sanding. But yours looks beyond that point. Consider a "Herreshoff" treatment. Painting the bulkheads & paneling white and leaving the teak trim natural. You can fill and paint as needed. This picture is somewhat representative of the treatment.
Good luck with your project.

upload_2017-3-24_7-5-55.png
 
Pete

The previous owner of Dana had the instruments mounted on both bulkheads in the cockpit. It was extremely inconvenient to be constantly asking crew and guests to move so to be able to see the gauges. I removed and relocated all the instruments. Now the aft bulkhead in the cabin is riddled with the remaining holes. This spring I am refinishing those areas with white formica. It will reflect the "Herreshoff" look. I'll be taking photos of the project as it goes along and keep the board updated.

The condition of your bulkhead woodwork in the photos appears to be beyond just a painting fix. Finding the source of all the leaking and the damage below the surface wood should be your first priority.

Jim
 
[[/ATTACH] 5945273_20161019082829854_1_XLARGE.jpg photo_5395.jpg

Thanks gents for the input.

Bulkead is solid, with some damage to veneer.

Leaks mostly came from original ports according to prior owner who replaced them. There was some additional leakage as the boat sat with the head port not fully dogged down and need for some additional bedding. We seem to have gotten them all.

The pics show the look we are going for.

Hopefully i can do the Home Depot option of paint and filler, otherwise the marine supply version.

Looking for input on types of paint - i have had good luck with Pettit one part polyurethane for some applications, not sure it makes sense here as will for sure be glossy. I have also had decent luck with Rustoleum marine paint carried at Home Depot, also a glossy solution.

More importantly looking for input on recommendations for filler to use where the veneer has separated and will no doubt come off in prepping the surface. Hopefully not too much comes off so that the fill and paint approach can work reasonably well.

If we have to go to removal of the teak panels and replace with some other material looking for recommendations and sources for that. Ideally a home depot solution.

Thanks again,

Peter

And no matter what, hoping not to open a can of worms!
 
Peter,
My plywood at the port level was wood damaged too. I removed it on the starboard side and replaced it but it was quite a job. I had to grind it off the cabin walls with a disk sander. I then covered it with a product called Polywall from Lowes. I purchased the almond color which needed to be special ordered. It is plastic and needs to be glued on with FRP panel glue. Note, I also put Polywall on the headliner and below the settees.

IMG_0080.JPG
 
Last edited:
Beautiful job Tom ! Pete. you must stop the water leaks before you can move forward Used Bytal tape around those ports A RV store 10 bucks !
 
That's a look we can shoot for, nicely done Tom!

I hear more and more good things about Butyl tape Lee. I think we got all the leaks but agree we've got to get them before putting in any effort.

Thanks for the input.
 
I am wondering if anyone has had success replacing the house side walls with teak plywood (1/8" or 1/4"?) or veneer over the existing plywood. If so, is it possible to get a decent color match to the existing cabin teak and what supplier did you use?

I ask as I am currently looking at a boat for purchase that needs this repair.
 
That's a look we can shoot for, nicely done Tom!

I hear more and more good things about Butyl tape Lee. I think we got all the leaks but agree we've got to get them before putting in any effort.

Thanks for the input.

I used butyl tape when I replaced my ports with New Found Metal ports. Its the way to go as Lee said.
Dave
 
Veneering is very tricky and cannot be glue on plywood that is not solid. I replaced portions of my sides and the entire inside bulkhead at the companion way with 1/4 inch teak plywood. That worked well. I will send pictures. Also used butyl tape for my NRM ports. The plastic ports were toast and would not seal from the weather.
 
Captpete, there are wonderful articles on a website, phase.com part of Mainecompass.com. One deals with the use of butyl tape ,they also sell it. Great stuff real sticky.
 
Here, I have taken off the teak 1/4 plywood from the inside companionway that had rot and replaced with new. I also laminated teak in the galley where there was a little door to the icebox pump and around the cabinets bottoms and the face of the cabinets above the stove. There was some wrinkle in the cabinet that the pictures do not show but overall, it worked out. Like I said, gluing laminate is tricky. I also re laminated the formica on the counter tops.
 

Attachments

  • IMG_1862.JPG
    IMG_1862.JPG
    1.5 MB · Views: 211
  • IMG_1859.JPG
    IMG_1859.JPG
    1.7 MB · Views: 218
  • IMG_1858.JPG
    IMG_1858.JPG
    1.6 MB · Views: 193
The sides where the ports are, were damaged somewhat but I only had to added a 1/4 inch thick teak plywood under one of the fixed window/port. ( the length of the port). The companionway inside the boat was rotted out totally all the way to the 3/4 inch plywood bulkhead that the teak had been glued to. It came off cleanly from the bulkhead wood that was solid. I then made a template with paper, and cut from a teak plywood 1/4 inch and used outdoor construction glue in a tube to glue it to the bulkhead. I only had to add a small piece for the entire companionway to have new teak. I do have a few spots on the side near the ports that have some softness from water, but not enough to replace it. I tried to re-glue that and it looks ok. I have some staining that did not finish out evenly but not bad. Adds character as they say. So far in the interior rebuild, I have use 2 sheets of 4 X 8' teak and 2 veneer sheets of teak that were also 4 X 8'. I am now gluing up with contact cement ( hate that stuff) marine vinyl I ordered from All Vinyl.com, under all bottoms in the boat. Also am using 3M 77 glue spray which gets all over the boat so I am using plastic drop cloth for that application. I will use the same vinyl for the headliner without foam back. I haven't started that. I have started replacing the liner of the insides of the hull, I have glued foamback marine vinyl the hull sides on the veeberth, pilot berth and the aft berth.

I'll post more pictures as I get this done.
 
John the boat looks fantastic. What do you mean by installing vinyl under all bottoms in the boat? Thanks Rick
 
The inside part under the deck, such as the pilot berth top and where there was Masonite boards. I am not putting those back up. I plan to sand smooth the underside of the raw fiberglass and apply the vinyl to that. You can see in third photo the underside of the deck where I have taken down the board with the vinyl. I will glue vinyl directly onto that. I plan to have indirect lighting behind the sides where the ports are along the length of the sides.
 
Im sure you know that the difference between varnish shine and No shine is the amount of Talc added.
 
I am wondering if anyone has had success replacing the house side walls with teak plywood (1/8" or 1/4"?) or veneer over the existing plywood. If so, is it possible to get a decent color match to the existing cabin teak and what supplier did you use?

I ask as I am currently looking at a boat for purchase that needs this repair.
 
If your using bytal tape ( any RV store) in summer , put the tape in strips in the refrigerator first . I have found doing a NFM port that a paper punch so a hole can be made in the tape and fit the hole around the bolt. This with 4200 should stop the water.
Dont tighten the port to max tight give it a few weeks to set in and seal itself. Maybe a quarter turn of bolts a couple of weeks later maybe even a shorter bolt. . If bolts have bottomed out with the trim ring there may not be enough pressure to seal. Avoid over sealing.
 
I would tend to use I/4 inch teak one side plywood. Varnich and seal the back side first. !
I like to make a pattern first . Use the old unless its very bad for a pattern . If not I like to use Door skins 1/8 plywood Home depot cut in 2 inch strips. Than Measure and cut and Hot glue gun till a pattern is formed. Brace well as its thin wood and will break easy . I used this method to make a pattern to replace the formica on countertops and cockpit grate .
 
Peter, if the teak veneer has not delaminated - that is, if the only damage is to the varnish on the teak veneer and no structural damage, you could try removing the varnish without damaging the veneer using, e.g., mineral spirits and 3M Scotch-bright (the yellow ones, not the blue ones) - that's what I'm doing around the companionway.

Or, if you don't want to paint - a la Herreshoff, like Jeff Lovett has done on Pilgrim - you could replace the teak veneer like Rick Noddin has done beautifully on Xanadu.

- Steve
 
Thanks Steve and all for the insights. We wound up repairing damaged wood that included teak veneer delamination as well as some pure rot by using some wood filler in thin spots and some fiberglass and epoxy in the deep damage spots. then we ground and sanded - a messier and more involved effort than we were looking to do - and then painted. It is by far not perfect but much less involved than a replacement with thin teak plywood or removal and replacement of teak plywood panels with some manmade panels (in the long run we may go that way). But we are pleased with the difference in look (as long as you dont look too close) and we really like the white as it brightens things up. I was worried about white on main bulkead to port but not the bulkheads to starboard but find that with the white over the pilot berth there is good balance. As we get to know and use this boat more I am really liking it.
 

Attachments

  • IMG_4123.JPG
    IMG_4123.JPG
    486.6 KB · Views: 119
  • IMG_4124.JPG
    IMG_4124.JPG
    412 KB · Views: 99
Back
Top