• Welcome to this website/forum for people interested in the Morgan 38 Sailboat. Many of our members are 'owners' of Morgan 38s, but you don't need to be an owner to Register/Join.

refrigeration idea/question

schlepper

John m. Harrison
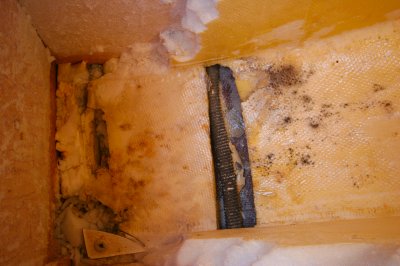
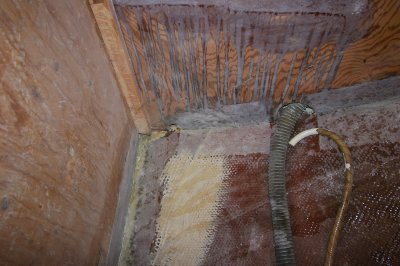
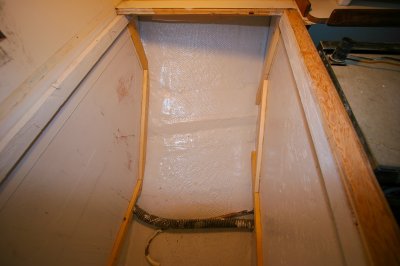
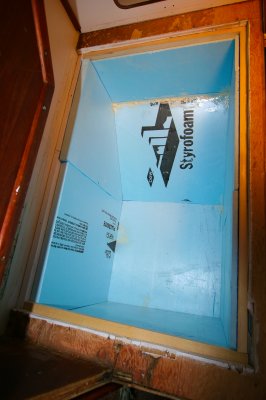
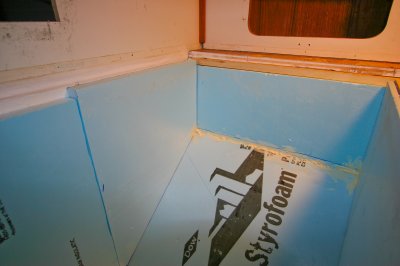
When I bought my boat in 2012, I remember thinking how small the refrigerated box was from a volume perspective. At some point, I tried to look up all prior owners of my boat from before the person I bought it from. I found two owners back, an older fellow, who was in his early 80's at the time (circa 2015). As I talked to him, he told me with a great deal of pride, how he had re-done the icebox. He had cut and glued pink insulation into the original fiberglass tub, then fiberglassed over the insulation. That explained a lot. I then proceeded to rip all of it out as it severely restricted the amount of refrigerated food we could carry and I was not so sure that it helped that much and as I ripped it out, saw that he had no moisture barrier nor a drain, therefore, you can imagine the pink foam was wet and therefore it's insulation capability was compromised.
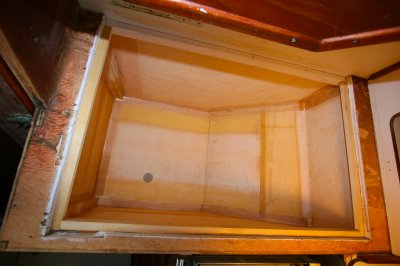
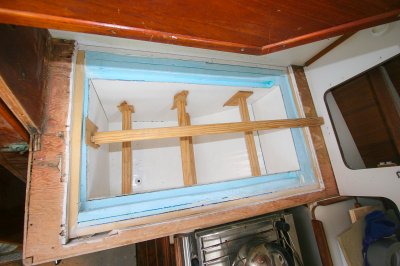
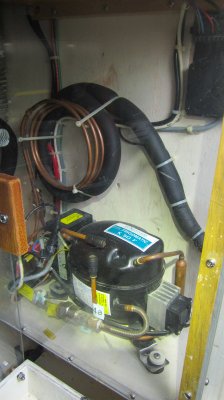
I have since installed painted wire closet shelving in there, but in all reality, I am not happy with the efficiency of the storage capacity. Furthermore, I had replaced the original Adler Baber air cooled compressor and refrigerated box with a Vitrifrigo unit that seems to do a pretty good job of keeping the box cool except for the outboard end of the box.

This is where my idea springs forth.

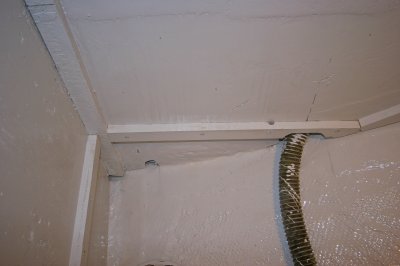
Has anyone utilized 2 refrigeration units? 1 to keep refrigerated foods cold, and the other to keep frozen goods? I was thinking instead of doing major surgery to completely rip out and replace my tub and insulation, it might be better to built a freezer box within the icebox, to the outboard end of the icebox, and use that for frozen foods, away from the engine, and insulate underneath of the icebox better and under the lid better? I have found that the major glaring insulation problem with our original iceboxes is underneath the countertop and the lids to the icebox itself are grossly un-insulated and I feel sure act as heat sinks, making the refrigeration units work very hard and drawing a lot of amperage.

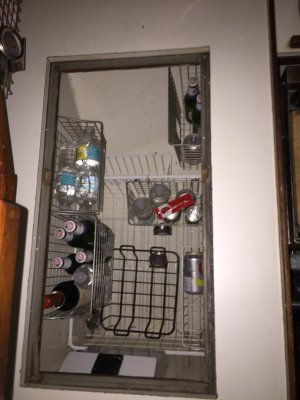
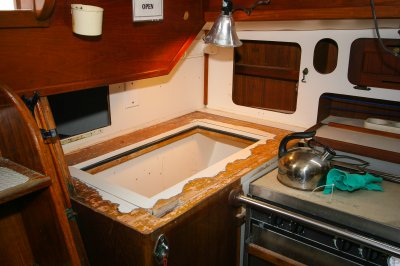
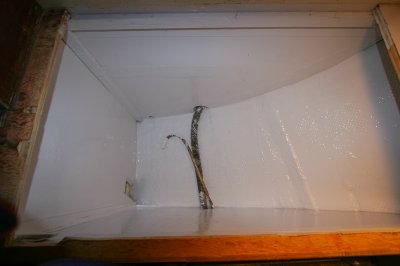
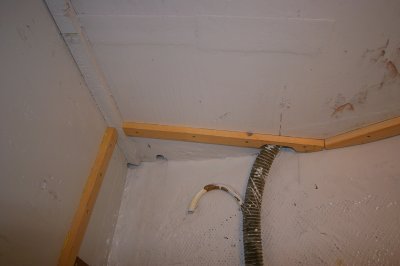
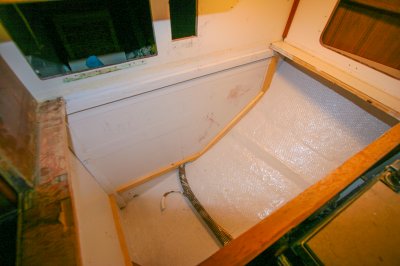
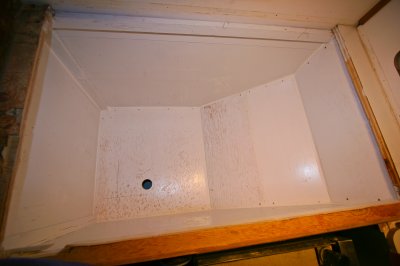
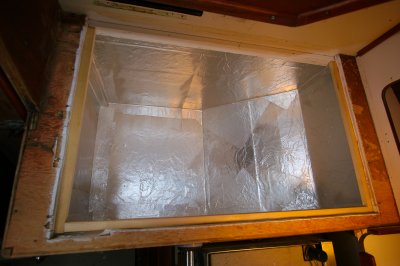
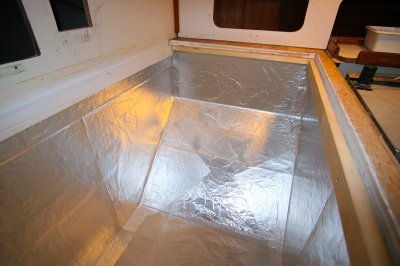
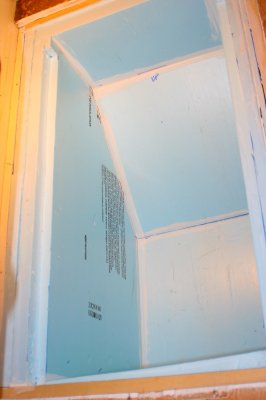
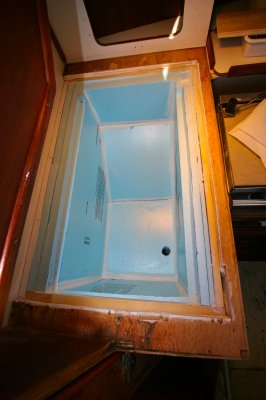
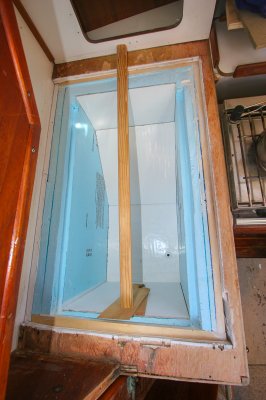
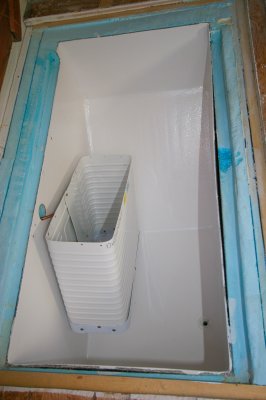
My second question is this: Does anyone have pictures of the interior of their icebox that I could get some ideas about how to better construct shelving, etc. Inside the fiberglass tub? I will attempt to attach a photo of mine as it exists now... I lose a lot of room to the outboard end and at the bottom given the odd shape of the icebox tub.

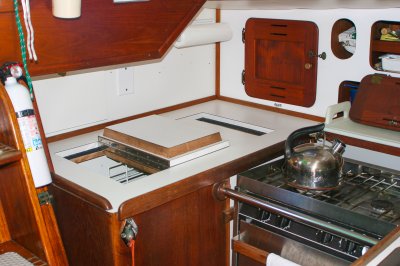
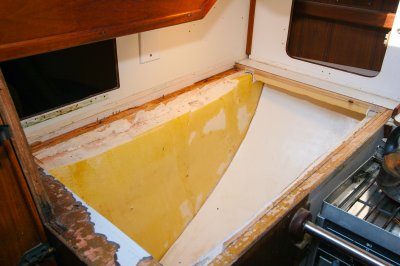
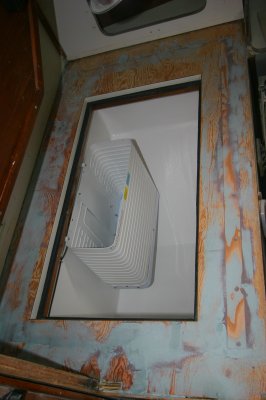
The second photo is the before photo with the prior owner modified box. It may not look like it but a great deal of space was lost with that configuration and I was never convinced the R value was that much better than the stock icebox.
 

Attachments

  • IMG_0247.JPG
    IMG_0247.JPG
    810.2 KB · Views: 71
  • IMG_7122.JPG
    IMG_7122.JPG
    800.3 KB · Views: 70
John
When we ripped out the old box, right down to the hull & bulkheads, we found that the original blown-in insulation was deteriorated and useless. Additionally the bottom of the box was built right against the hull where the insulation was damp from condensation. The new box has 4" of blue form insulation, a mylar vapor barrier, a aluminum foil heat reflector and an air space, in addition to the 4" of foam, along the hull. The box was reduced to just over 6 cubic feet. It was enough room for an eight month journey from NY to the Bahamas and back. Our unit is the Frigaboat with the keel cooler heat exchange. The evaporator in the box makes ice and keeps some foods frozen. We kept the original top but replaced the insulation with the blue foam. The system has worked now for 10 years and many miles. I'll post some photos.

Jim
 

Attachments

  • Dana Galley Redo-1.jpg
    Dana Galley Redo-1.jpg
    3.5 MB · Views: 63
  • Dana Galley Redo-2.jpg
    Dana Galley Redo-2.jpg
    2.7 MB · Views: 56
  • Dana Galley Redo-3.jpg
    Dana Galley Redo-3.jpg
    3.4 MB · Views: 53
  • Dana Galley Redo-4.jpg
    Dana Galley Redo-4.jpg
    3.1 MB · Views: 49
  • Dana Galley Redo-5.jpg
    Dana Galley Redo-5.jpg
    3.4 MB · Views: 51
  • Dana Galley Redo-6.jpg
    Dana Galley Redo-6.jpg
    3.6 MB · Views: 50
  • Dana Galley Redo-7.jpg
    Dana Galley Redo-7.jpg
    3.4 MB · Views: 51
  • Dana Galley Redo-8.jpg
    Dana Galley Redo-8.jpg
    3.9 MB · Views: 47
  • Dana Galley Redo-9.jpg
    Dana Galley Redo-9.jpg
    3.8 MB · Views: 51
  • Dana Galley Redo-10.jpg
    Dana Galley Redo-10.jpg
    3.8 MB · Views: 52
John Here's more photos.
 

Attachments

  • Dana Galley Redo-11.jpg
    Dana Galley Redo-11.jpg
    3.1 MB · Views: 51
  • Dana Galley Redo-12.jpg
    Dana Galley Redo-12.jpg
    3 MB · Views: 48
  • Dana Galley Redo-13.jpg
    Dana Galley Redo-13.jpg
    4.4 MB · Views: 52
  • Dana Galley Redo-14.jpg
    Dana Galley Redo-14.jpg
    3.6 MB · Views: 51
  • Dana Galley Redo-15.jpg
    Dana Galley Redo-15.jpg
    3.4 MB · Views: 51
  • Dana Galley Redo-16.jpg
    Dana Galley Redo-16.jpg
    3.1 MB · Views: 52
  • Dana Galley Redo-18.jpg
    Dana Galley Redo-18.jpg
    3.2 MB · Views: 53
  • Dana Galley Redo-19.jpg
    Dana Galley Redo-19.jpg
    3.5 MB · Views: 52
  • Dana Galley Redo-20.jpg
    Dana Galley Redo-20.jpg
    3.6 MB · Views: 55
Still more photos. If you have question about any of them, just ask.

Jim
 

Attachments

  • Dana Galley Redo-21.jpg
    Dana Galley Redo-21.jpg
    3.4 MB · Views: 54
  • Dana Galley Redo-22.jpg
    Dana Galley Redo-22.jpg
    3.5 MB · Views: 49
  • Dana Galley Redo-23.jpg
    Dana Galley Redo-23.jpg
    2.7 MB · Views: 50
  • Dana Galley Redo-24.jpg
    Dana Galley Redo-24.jpg
    3.2 MB · Views: 49
  • Dana Galley Redo-25.jpg
    Dana Galley Redo-25.jpg
    4.4 MB · Views: 50
  • Dana Galley Redo-26.jpg
    Dana Galley Redo-26.jpg
    3 MB · Views: 52
  • Dana Galley Redo-28.jpg
    Dana Galley Redo-28.jpg
    3.4 MB · Views: 52
  • Dana Galley Redo-29.jpg
    Dana Galley Redo-29.jpg
    3.3 MB · Views: 56
  • Dana Galley Redo-30.jpg
    Dana Galley Redo-30.jpg
    3.6 MB · Views: 51
  • Dana Galley Redo-31.jpg
    Dana Galley Redo-31.jpg
    3.1 MB · Views: 54
Jim, your photo history is impressive. I have a hard enough time doing the work and have no energy to document it.
John, having a smaller box is the only way to avoid lots of lost amps trying to keep things cool. Someone other than Jim also ripped out the box and started over again. Check the archives. I was too lazy to rip everything out, I took what I thought would be the easier but more expensive route. I had RParts in California make me a bunch of 1 inch and 1 1/2 inch fiberglass covered vacuum panels (R value about 40 and 50.I then installed 1 inch blue board inside the existing box, then a thin aluminum barrier, then the vacuum panels. I sealed all seams with 291 Sikaflex. I then installed an Ozefridge water cooled 2-holding plate refrigeration unit . I thought I could just use the lower, inner part of the box for a freezer, it is where the holding plates are and under a wooden shelf. But I have discovered the freezer unit doesn't always quite get cold enough--or if I lower the temp, my milk and beer freeze. But I can create ice--just not a lot at once. My shelves are created by gluing wooden battens to the fiberglass sides of the box to hold aluminum or wooden shelves. On the outboard area of the box, the aluminum shelves slide so I can reach down into the lower recesses of the box. In retrospect, there was surely a better way to create a freezer-- perhaps a completely separate box with its own holding plate, but I don't really need a deep freeze.
 
Oh, one other thing. I note Jim has a drain hole. I don't. If water accumulates in the bottom of the box, I use a hand pump to remove it. (It is from condensation and is usually frozen however.) All the advice I read was that a drain hole leaks quite a bit of cold air. But if you had a plug, that would probably work to reduce the loss.
 
Hi John & everyone - I had previously posted some “in progress” photos of our icebox refurbishing on this thread:
https://www.morgan38.org/morgan38/index.php?threads/icebox-rebuild.15257/#post-127952

But I don’t think I ever posted any photos when it was done. We totally tore out everything and re-insulated with foam board and Aerogel (in the narrow forward section), plastic and foil/reflective material.

I made a plug out of wood, then made a totally new fiberglass/epoxy box.

We got a Cool Blue refrig unit and made an insulated separator between the area where the cold plate is located (on the left in the pictures below) and the rest of the box. So one side is a freezer and the other side is refrigerator. Kind of like what John was asking about, I think.

I used an insulated lid from R-Parts and made a top counter out of Corian. We are very happy with everything. Things have been working now for 2.5 years with no problems (knocking on wood and epoxy!!).

It is insulated much, much better than the original factory install and barely uses any power to keep things cold. We also didn’t need to do another thru-hull fitting for the refrigerator, which I was happy about.

We have the very rightmost (port) strange corner of the old icebox blocked off and super insulated because we needed to run a 3” heating duct through there for our very lovely Webasto forced air heating system. So that used up a small amount of volume from the refrigerator box, but the heater was a game changer for my wife. It was worth it ;)

D12DBDBD-2856-4365-913F-FAE2614A6987.jpeg


21EC0DD1-F8E4-40A2-A800-31D733FB8F0B.jpeg

A3A1B668-E445-451A-998D-6E6E953A33DC.jpeg


6544B254-8823-4F17-BAE8-AC5760458BD8.jpeg
 
Last edited:
Terry

The drain hose which comes off the bottom of the box is designed with a loop, similar to a toilet, to trap water and block the outflow of cold air. The hose then goes to an electric pump under the galley sink that discharges into the sink.

Jim
 
Mark, the way it looks in these photographs, is well, it is incredible. Thanks for sharing it. I am undecided on what if anything I will do. I temporarily rigged up a new fan (original died) that forces air down the top of my frigo refrigeration unit, and the super cold air comes out the bottom. The whole evaporator is shrouded in a white plastic shell that encapsulates the evaporator as well as protects it from anything damaging it. I rigged another fan in the same circuit ad the force air fan but ran it down at the bottom of the unit, to give the cold air coming out some boost to distribute better throughout the stock icebox I have. It seemed to do pretty well yesterday, getting the lower shelf down to 30 degrees and the upper shelf to right around 35 or so, and that was on the lowest thermostat setting. But..... it is running all the time, and the ambient temperatures are in the 70's now. Add engine heat and summertime in Florida and I wouldn't expect it to be so cool in there. I'm also puzzled that it is running all the time, I don't think it ever shutoff yesterday and I don't think that's a function of the temperature as much as it might be a problem with the thermostat in the unit perhaps.

One problem with these top loaders and the limited space is that what I have found is we wind up with the entire volume of the box crammed full of food so there is virtually no way any cold air is going to get outboard edge of the box, even if I modify it.....

Oh well, thanks everyone for the photos and the ideas, I have some thinking to do about this!


Hi John & everyone - I had previously posted some “in progress” photos of our icebox refurbishing on this thread:
https://www.morgan38.org/morgan38/index.php?threads/icebox-rebuild.15257/#post-127952

But I don’t think I ever posted any photos when it was done. We totally tore out everything and re-insulated with foam board and Aerogel (in the narrow forward section), plastic and foil/reflective material.

I made a plug out of wood, then made a totally new fiberglass/epoxy box.

We got a Cool Blue refrig unit and made an insulated separator between the area where the cold plate is located (on the left in the pictures below) and the rest of the box. So one side is a freezer and the other side is refrigerator. Kind of like what John was asking about, I think.

I used an insulated lid from R-Parts and made a top counter out of Corian. We are very happy with everything. Things have been working now for 2.5 years with no problems (knocking on wood and epoxy!!).

It is insulated much, much better than the original factory install and barely uses any power to keep things cold. We also didn’t need to do another thru-hull fitting for the refrigerator, which I was happy about.

We have the very rightmost (port) strange corner of the old icebox blocked off and super insulated because we needed to run a 3” heating duct through there for our very lovely Webasto forced air heating system. So that used up a small amount of volume from the refrigerator box, but the heater was a game changer for my wife. It was worth it ;)

View attachment 7930


View attachment 7932

View attachment 7933


View attachment 7931
 
John, if there was an easy way for us to do a "refrigeration system transplant" between our boats, we should consider it.

Up here in the cool northwest, my extremely (overly?) well insulated box and Cool Blue refrigerator mandate that I set my thermostat to the extreme lowest setting, or I freeze everything into blocks of ice. Which we did at first. And it hardly ever runs (aka draws electricity).

We plan on taking Zia south one of these years, so we will wait on being a transplant donor. ;)

Before we rebuilt the icebox we didn't notice any big problem with heat from running the engine, but we did notice a huge problem using the oven. It melted everything in the icebox. We don't have that problem any more.

Thanks for sharing your info, and keep us posted on what you do.
Cheers,
-Mark
 
Last edited:
Back
Top