• Welcome to this website/forum for people interested in the Morgan 38 Sailboat. Many of our members are 'owners' of Morgan 38s, but you don't need to be an owner to Register/Join.

Haulin and checking seacocks / considering painting

Jay Gholami

New Member
Hi all,

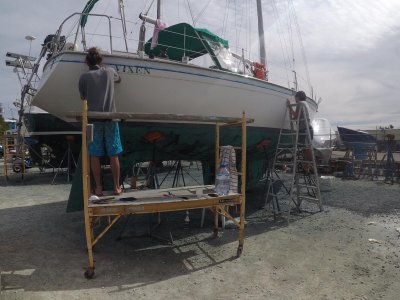
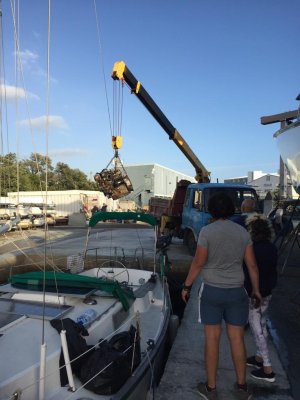
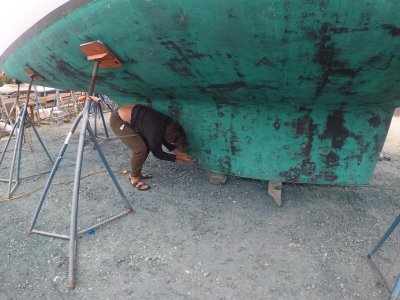
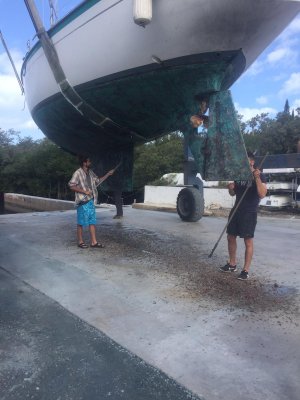
Taking Vixen to a yard in a couple of weeks to get a Beta 38 installed (ordered last week and due to arrive 22nd Feb). Whilst we’re at the yard, she’s going to get hauled so we’ll be giving her a clean and checking all the seacocks. None have been used for years so they’re long overdue a once over.

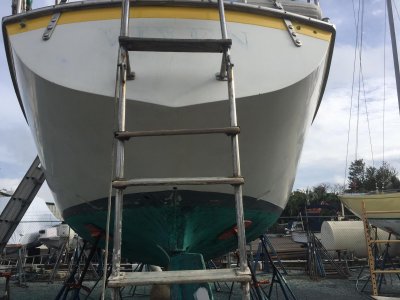
Me and Lauren would like to repaint her in a light grey (above waterline) and dark grey (below waterline). A friend and fellow sailor here in Bermuda has given us some advice and explained the different types of paint. Based on this info and the fact we’re going to do the work ourselves, we are thinking 1-part paint above the waterline and using rollers and a paintbrush to finish.

Any advice would be great,
- any suggestions on what else we should do whilst she’s hauled?
- any work we should do whilst the old engine is out and engine bay empty? Repaint and sound proof I guess?
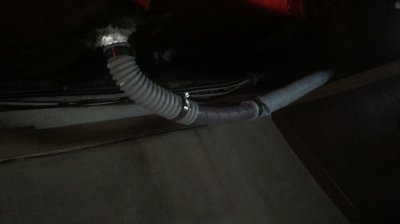
- I had a read on the forum regarding the torpedo tubes as ours are shot (currently held together with some 1inch pipe / pipe clamps). Anyone know an easy way to swap these out with something?
- what should we be looking for when checking over the seacocks? At what point, do these need replacing entirely?
- will a handheld sander followed by 2 coats of primer be sufficient prep? Some videos online show deep sanding on blisters then filling with epoxy.
- we plan on flying the paint over as everything’s expensive on Island, any retailers in the US people suggest / brands?
- how much paint should we be using, I’ve read bottom paint is 3 gal / 2 coats on another thread? I’m assuming this is antifouling paint below waterline only?
- I can probably give about 5 or 6 days and Lauren doesn’t work so will be full time working on Vixen for a week or so, anyone done a repaint / know how long it takes?

Appreciate there is a lot of queries here. Any advice, warnings, suggestions would be greatly appreciated!

Thanks,
Jay and Lauren
 
Did you just buy the boat? Did it used to be Dick and Judy Kilroy's boat?
First thought, this is more than a week's work. Good Luck. On the torpedo tube, that itself is a big job. they were PVC with some sort of goop to hold them in place. Can't glass over PVC. And they are hard to access, even with no engine. I would suggest eliminating the tube altogether, but that requires new through hulls of some sort. If you try to repair/replace them, I would go with Fiberglass tubing of the right size, glassed to the hull on the inside. But, as I say, the tube is hard to access and it scared my boat yard away from the project. No one part paint rolled and brushed will look as good or last as long as two part sprayed. But a friend used EasyPoxy and it looks very good. But it was applied professionally. I would urge you to consider trying to restore the gelcoat with buffing and waxing. My gel coat after 40 years still holds a shine when waxed. Do you have blisters above the waterline? Those below, if deep, need time or heat dry once you remove them. And the Morgan hull is not very thick in many areas, so if you have deep blisters, you will need to build back some laminate. Seacocks, if proper bronze Groco, for instance, will last almost forever. Morgan did not install them correctly, though I admit I have only fixed the mounting on a couple of mine. That is a time consuming job, as well. Good description of methods on Compass Marine how-to site.
 
Purchased the boat in September - it’s not Dick and Judy Kilroy’s, just another Morgan called Vixen (more info on one of my posts in the Pub forum).

To be a little more specific about what we plan on achieving and what timescales, we’re not doing the engine ourselves. The plan is to have the boat out for a few weeks (I’ll be working so will only have mornings / lunch / evenings / weekends, my partner does not work but realistically won’t be getting up to much without me - although she’ll beg to differ). I’ve been told 5/6 days for a prep and repaint should be pretty easy, especially with two pairs of hands, interesting to hear you disagree.

Thanks for the advice regarding seacocks, I’ll check the material / brand. Also, I’ve never fibre glassed, so it’s good to know I can’t fibre to PVC. If im honest, i was considering it... I’m sure this has been debated before, so apologies if I’m repeating previous discussions - but what’s wrong with fresh pipe, pipe clamps and 5200 around a PVC funnel. Appreciate this looks ugly, it’s our current solution on both deck drains. But is it considered unsafe? We live on the boat so we often check for blockages / leaks.

To be honest I’m not even sure if it’s the original gel coat, will take a closer look and maybe upload some pictures. I’ve not seen any blisters above the waterline, just a few cracks here and there. I don’t really want to spend a lot on a professional spray, I’m not too fussed about a shine, would be happy with old looking matt finish... She just currently looks a bit sad, a dull off white!

Jay
 
Current ‘fix’ under the rear quarter berth. The ol’ clampy clamp-clamp approach.
 

Attachments

  • 349FE91D-B0E0-495A-9890-A4CF98178052.jpeg
    349FE91D-B0E0-495A-9890-A4CF98178052.jpeg
    786.3 KB · Views: 99
Not glassing PVC didn't stop Morgan from trying. My boat had a 90 deg. hose barb glassed in there. Yes, it leaked. Gobbed it with sealant. My plan to fix it was to remove it, glass the area shut, drill a hole and put a bronze 90 deg. flat mushroom fitting in there. Re-hose all the way to the torpedo tube, which would need to be removed & re caulked at the very least. Glassing in a prefabbed fiberglass tube would be the best way. Big job as Terry said. Access is the issue

Jay if you're out of the water for just a week, forget painting. Have the hull compounded and waxed. See what you have. You could spend a week (easily) just prepping one side for paint. Like any painting job, the time spent getting the surface ready is what makes the better outcome. Painting's the easy part. (maybe!)
 
Google Island Girl Its a clear wax elixor and supper hard wipe on and instant shine 3 years. No buffing no wiping Not Cheep but its a no beainer No work no Buffing ! Good Luck
 
Thanks all for your advice.

After a few setbacks and learning we have the original gelcoat, we decided against repainting. As you've suggested Dave, we're going to buff / wax.

We figured some of you might be interested in what we've been up to / want to see a few pictures,
- repainted the top thick stripe
- removed the sticker and repainted the thin strip, removing the sticker was a nightmare for anyone considering this
- sanded below the waterline and sanded out blisters, we only had about 5 or 6 and they don't seem to be deep - we think?
- refurbished prop
- replaced water guard / stuffing box
Engine work
- we've removed the engine and cleaned the bay ready for the the Beta 38 which will be craned in this evening
- changed the soundproofing (old stuff was powdery and gross)
- new coupling component
- fuel lift pump installed
- anti-syphon valve installed

This is what we have left to do over the next 8 days - advice welcomed!
- check seacocks
- replace tank valves (has anyone tackled this, we assume access is a nightmare....?)
- fill blisters with epoxy (someone has suggested 'Splash zone EZ-Fair', anyone have experience using this?)
- paint bottom with anti-foul (undecided on whether to do 1 or 2 coats?)
- fabricate engine mounts then fit engine and control panel, based on the advice from fellow Morgan owner Beta installs on this forum
- attempt to restore the gelcoat (im thinking 3M restorer and wax, anyone have experience using this?)

Photos attached.

Thanks for the help.

Jay and Lauren
 

Attachments

  • WhatsApp Image 2019-03-01 at 08.52.05.jpeg
    WhatsApp Image 2019-03-01 at 08.52.05.jpeg
    128.9 KB · Views: 67
  • WhatsApp Image 2019-02-28 at 19.23.12(1).jpeg
    WhatsApp Image 2019-02-28 at 19.23.12(1).jpeg
    258 KB · Views: 66
  • WhatsApp Image 2019-02-28 at 19.22.29.jpeg
    WhatsApp Image 2019-02-28 at 19.22.29.jpeg
    90.9 KB · Views: 69
  • WhatsApp Image 2019-02-28 at 19.23.12.jpeg
    WhatsApp Image 2019-02-28 at 19.23.12.jpeg
    308.7 KB · Views: 70
We replaced most of our thru hulls and seacocks on our 78 382 as she had the original gate valves, two of which weren't even working so it was shall i say difficult to sleep at night knowing we could not close off the water from coming in the boat with the originals... The only way we could get the old ones off was to destroy the thru hull they were attached to. And they had original plywood backing plates which were pretty much toast so we had to come up with a right sized and well sealed solution. Thruhull replacement was a bit of a challenge as the ones on our boat were flush with the hull so we had to find the correct sized ones to fit into the existing indent in the hull. We also had to decide if we were going to install true sea cocks or just work with in line ball valves that most folks don't recommend using but make for an easier installation. So the job was not insignificant.
 
You asked about the 3M wax. I have used the 3M Restorer and Cleaner wax products for 20+ years and have always had good results. I don't know anyone else using it but I have good luck with it on two different boats. You can get a very good shine, enough to see reflections, though it is a bit of a work out for your arms. The Restorer version is more abrasive than the cleaner version, so you might do it the first couple of years with the Restorer and then switch to the Cleaner once you get ahead of it.

I do the Morgan topsides each spring before launch from a stepladder and usually the cabin top later when it is in the water. Before you wax you need to get any waterline stains off, since the wax won't remove them, but it will remove scuffs and heel marks. I use Boat On-Off along the waterline and then rinse it off well. It probably takes 10-12 hours total to do everything on the Morgan. I apply it by hand with a damp rag and rub it in, then another rag to wipe it off after it dries a little. That's not exactly per the instructions but seems to work. .
Steve
 
Thanks for your reply Capt Pete, fingers crossed ours do not need as much work - they're getting checked over by someone in the yard this week. We're hoping to be back in the water this weekend so wouldn't have the time!

Cheers Steve, we'll give the 3M a go. Sounds like a lot of work to do this all by hand, might see if the yard we're at have an orbital buffer laying around... Already given Vixen a once over with the on-off last week and it came up pretty good, highly recommend! We used a flat head mop thing, applied, waited, rinsed. Before and after pictures attached - you can see the exhaust stains have mostly gone.

Jay
 

Attachments

  • WhatsApp Image 2019-02-28 at 19.19.19.jpeg
    WhatsApp Image 2019-02-28 at 19.19.19.jpeg
    216.7 KB · Views: 50
  • WhatsApp Image 2019-03-03 at 16.16.26.jpeg
    WhatsApp Image 2019-03-03 at 16.16.26.jpeg
    200.1 KB · Views: 45
From those two photos it looks like your gelcoat is in pretty good shape, about the same as mine. The 3M will do a good job of shining that up. Painting the topsides would be a very, very expensive proposition and should be a last resort. The two part polyurethane paints look great when new but are fragile too and as my neighbors in the boatyard have told me it last that well. Much better to retain your gelcoat surface as long as you can.
Steve
 
Back
Top