Wow. I recently finished cleaning our fuel tank and polishing the fuel. I am very glad I did this - there was an alarming amount of sediment and poop (really!) in the tank.
If you don't know if your tank has been cleaned recently, I’d highly recommend doing it. The following is probably “too much information” for a casual reader, but hopefully useful for someone considering doing this process.
Caveat #1: If you have a gasoline fuel tank (probably not a Morgan 38), don’t do this! There is a lot more danger of explosion & you could blow yourself and your boat up. You’ll want to be very aware of sparks and grounding.
Caveat #2: If you do this, be sure you know how to prime the fuel line to your engine. When you’re done, you will need to. It can be a little tricky. If you have a Perkins 4.108, I wrote a little cheat sheet many years ago here.
I used a new-age trick that I think is a game changer: an inexpensive ($40) endoscopic camera. This is a pencil-sized camera with bright lights that I could move around in the tank as I was inspecting and cleaning. I could watch things from my big & bright iPad (or computer) screen.
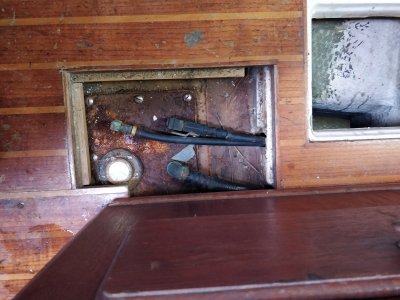
I don’t think the tank has ever been cleaned out. I know for certain that it hasn’t been in the last 15 years based on conversations with the most recent previous owner. But based on some of the things I found, I’d bet it has never been done in Zia’s 36 year life.
I had (7 years ago) removed the fuel gauge and peered down into the inspection hole (1-1/2”diameter) with an intense light. All I could see was black. I chose to close it back up and act like everything was OK. I rationalized it was probably a black steel tank and that’s why it was so dark in there. Spoiler Alert: it's a fiberglass tank with a shiny white gel coat surface. It was so coated with sediment, goop and crap that it looked like a cosmic black hole from which not even light could escape.
Our new Yanmar engine operates at very high pressures and I’d read a Nigel Caulder article about how filtration and clean fuel was even more important with these engines. Both my old Perkins manual and the new Yanmar manual recommend inspecting & cleaning the fuel tanks out annually. Yeah, right!
A note about particle sizes and filtration: A micron is one-millionth of a meter. The largest particle that a human can see with the naked eye is around 40 microns in size. Oddly, I cannot find any “official” micron rating on our Yanmar filter, but I’ve been told by one dealer that it is 2 micron, and by another that it is 10 micron.
I constructed a little polishing/cleaning rig from parts at Home Depot and Amazon.com. Total price was around $130. It polished the fuel in the tank to about 10 microns. In my opinion, that is very clean and ready for the Yanmar’s fuel filter.
1- Endoscopic Camera with Lights
2- 3/8” Copper Tube, Type L
3- WiFi Router, came with camera, allows iPad to view video
4- Pre-filter with Sight Glass
5- Diesel Fuel Pump, 12V, 30 GPH
6- R12T Fuel Filter w Water Separator
7- 2X4 Wood Stand
8- Fuel Hose, 3/8”
9- 5 Gallon Diesel Jerry Can
Perhaps more importantly: I cleaned the tank. We could easily polish the fuel to 10 microns but still have so much filth in our tank that wave action/bouncing could stir it all up, break it loose, etc. and plug our fuel filters. Precisely at a time when you don’t want a plugged filter & dead engine.
Some fuel polishing companies use high throughput pumps & filters to blast things loose (in theory). I’m quite sure that some of the gunk and poop I removed would not have been removed with just stronger pumping. And certainly I wouldn’t have been able to see it visually without the endoscopic camera.
I took the cheaper and slower approach and used a fuel pump that did 30 gallons/hour. I got a inexpensive Racor-like filter (hereinafter called R12T Fuel Filter) on Amazon.com with replaceable filters and a water trap. I hose clamped rags to the end of a copper pipe that was the intake, then I scrubbed and sucked it clean.
It took a two days of work and I went through a whole bag of those white rags from Home Depot. I plugged and replaced the R12T filter twice, so I went through 3 of those filters. I took apart and cleaned the pre-filter in the sink with water probably 20 times.
Here are the steps I took:
Here are my notes with 20/20 hindsight:
Videos
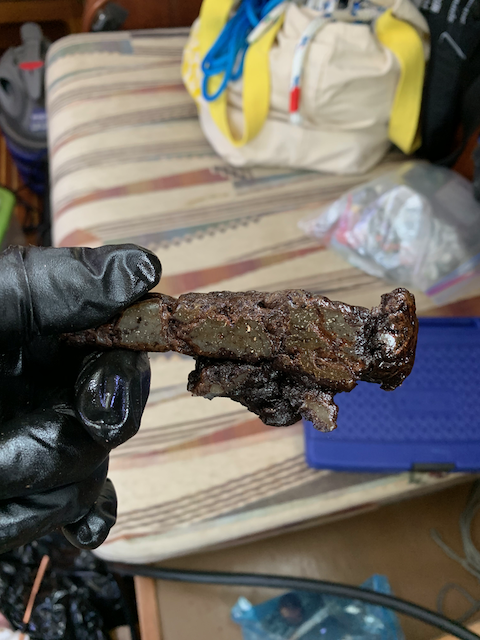
Petrified Dog Poop
My black gloved hand holding an apparent petrified dog poop I recovered from the fuel tank. It...
If you don't know if your tank has been cleaned recently, I’d highly recommend doing it. The following is probably “too much information” for a casual reader, but hopefully useful for someone considering doing this process.
Caveat #1: If you have a gasoline fuel tank (probably not a Morgan 38), don’t do this! There is a lot more danger of explosion & you could blow yourself and your boat up. You’ll want to be very aware of sparks and grounding.
Caveat #2: If you do this, be sure you know how to prime the fuel line to your engine. When you’re done, you will need to. It can be a little tricky. If you have a Perkins 4.108, I wrote a little cheat sheet many years ago here.
I used a new-age trick that I think is a game changer: an inexpensive ($40) endoscopic camera. This is a pencil-sized camera with bright lights that I could move around in the tank as I was inspecting and cleaning. I could watch things from my big & bright iPad (or computer) screen.
I don’t think the tank has ever been cleaned out. I know for certain that it hasn’t been in the last 15 years based on conversations with the most recent previous owner. But based on some of the things I found, I’d bet it has never been done in Zia’s 36 year life.
I had (7 years ago) removed the fuel gauge and peered down into the inspection hole (1-1/2”diameter) with an intense light. All I could see was black. I chose to close it back up and act like everything was OK. I rationalized it was probably a black steel tank and that’s why it was so dark in there. Spoiler Alert: it's a fiberglass tank with a shiny white gel coat surface. It was so coated with sediment, goop and crap that it looked like a cosmic black hole from which not even light could escape.
Our new Yanmar engine operates at very high pressures and I’d read a Nigel Caulder article about how filtration and clean fuel was even more important with these engines. Both my old Perkins manual and the new Yanmar manual recommend inspecting & cleaning the fuel tanks out annually. Yeah, right!
A note about particle sizes and filtration: A micron is one-millionth of a meter. The largest particle that a human can see with the naked eye is around 40 microns in size. Oddly, I cannot find any “official” micron rating on our Yanmar filter, but I’ve been told by one dealer that it is 2 micron, and by another that it is 10 micron.
I constructed a little polishing/cleaning rig from parts at Home Depot and Amazon.com. Total price was around $130. It polished the fuel in the tank to about 10 microns. In my opinion, that is very clean and ready for the Yanmar’s fuel filter.
1- Endoscopic Camera with Lights
2- 3/8” Copper Tube, Type L
3- WiFi Router, came with camera, allows iPad to view video
4- Pre-filter with Sight Glass
5- Diesel Fuel Pump, 12V, 30 GPH
6- R12T Fuel Filter w Water Separator
7- 2X4 Wood Stand
8- Fuel Hose, 3/8”
9- 5 Gallon Diesel Jerry Can
Perhaps more importantly: I cleaned the tank. We could easily polish the fuel to 10 microns but still have so much filth in our tank that wave action/bouncing could stir it all up, break it loose, etc. and plug our fuel filters. Precisely at a time when you don’t want a plugged filter & dead engine.
Some fuel polishing companies use high throughput pumps & filters to blast things loose (in theory). I’m quite sure that some of the gunk and poop I removed would not have been removed with just stronger pumping. And certainly I wouldn’t have been able to see it visually without the endoscopic camera.
I took the cheaper and slower approach and used a fuel pump that did 30 gallons/hour. I got a inexpensive Racor-like filter (hereinafter called R12T Fuel Filter) on Amazon.com with replaceable filters and a water trap. I hose clamped rags to the end of a copper pipe that was the intake, then I scrubbed and sucked it clean.
It took a two days of work and I went through a whole bag of those white rags from Home Depot. I plugged and replaced the R12T filter twice, so I went through 3 of those filters. I took apart and cleaned the pre-filter in the sink with water probably 20 times.
Here are the steps I took:
- I waited until the tank was less than 1/4 full. I only had 2 of the 5 gallon diesel jerry cans, and I reasoned that there should be about 10 gallons left. Note for the future: there was only about 6 gallons left when the gauge read 1/4 full.
- Removed the fuel gauge and started pumping through the filter and into the jerry cans. There was a huge amount of turbidity and very quickly the sight glass in the pre-filter was black and the bowl on the R12T Fuel Filter was black. This slowed flow down to a dribble.
- I decided I just wanted to get the fuel out of the tank and that I would use rags to mop out all the crap, rather than changing filters so frequently. So instead of moving the inlet around and stirring things up, I kept it quite stationary with the goal of only removing the fuel. It took about an hour to get the remaining 6 gallons out of the tank, and I stopped and cleaned the pre-filter about 10 times. In hindsight, my pre-filter was plugging even with the filter element taken out. Upon closer inspection, this was because the fuel needed to go through little holes that were about 1/16” diameter and many of the particles I was sucking out were bigger than that and plugging the holes. Also, I couldn’t find a rated throughput for this pre-filter, but I think 30 gallons/hr is unlikely.
- Then came the actual hard work. I cut the white rags into squares about 8 inches wide and hose clamped them to the end of the copper pipe. Using the endoscope, I scrubbed back and forth to clean the goop/sediment off the walls and bottom. See the "in action" video below. Repeated this a couple of dozen times. I added a gallon of my filtered diesel back when I needed more liquid to properly swab out the tank. When I started this step, the rags came out black with lots of sediment, metal shavings, slime, etc. They gradually got lighter and finally ended up being the pink color of the diesel. This took some time, but what the heck? It took 36 years for all this crap to build up so it seems reasonable that this step took 6 hours and a whole bag of rags to be clean again.
- I had to bend the copper tubing “up” a little bit when trying to push forward in the tank. The 3/8" copper tubing was Type L, which means it was fairly soft and could be bent to reach around corners or over humps. This would not have worked if it was rigid copper or a piece of dowel. There is a sump below the access port and where the fuel intake is located. See photo of the sump below. A straight probe would not be able to get over the edge of the sump, and into the forward portion of the tank. I was able to get about 36” forward of the access hole. That is also roughly the distance to the back of the mast, so I think I got the entire tank.
- During the swabbing of the tank I made a startling discovery: a brown/black object seemed to dart by the camera several times then disappear. Oh my god, is there something alive down there? Nope. It turns out there were some clumps of epoxy that literally looked like pieces of dog poop. They had only slightly negative buoyancy so if they were touched they would skitter across the tank like an air hockey puck. I luckily had an 18” long extraction tool and was able to reach in and pull them out. There were three different chunks and after I got them out I recognized it as a very hard/tough epoxy or polyester resin that I had seen used for tabbing when we stripped out the old icebox. I have no idea why they would be in the fuel tank but I’d say there is a 99% chance they were in there when Zia was built.
- I taped a brush to the end of the copper pipe and brushed the floor and walls to remove the attached grime. It was a soft bristle brush so I wouldn’t scratch the gel coat.
- Added the 5 gallons of filtered diesel to the tank and pumped it into the can again. This time it went very quickly and the little pump was able to move the fuel at its rated capacity of 30 gallons/hr.
Here are my notes with 20/20 hindsight:
- There is no way I would have left for our previous voyage in the Pacific up to British Columbia knowing there was that much junk in the fuel tank. To me, it’s really surprising we didn’t plug our fuel filters at a bad time. From now on, I’m going to inspect and clean the tank every year. It won’t be a time consuming thing going forward.
- I started out with the copper intake pipe being too long (6 ft) and it got in the way. Trimmed it down to 40" which was much more maneuverable.
- At one point I tried using those fuel absorbent pads instead of cloth rags. No bueno. They broke apart quite quickly and cloth rags worked better.
- I taped my camera to the tubing with duct tape, but the diesel dissolved the adhesive over time. Need to come up with a better way of attaching the camera to the tubing. Maybe thick rubber bands?
- The endoscopic camera was for sure the way to do this. It takes a little practice to get used to. Bend the copper tubing a little bit where the fuel hose attaches. This gives you a reference point for rotating and swinging the tubing. Swing the camera left and right and up and down. Rotate the camera until it is oriented to match your motion before taping it down. Otherwise you have the strange sensation of moving it left but it appears to move right, etc.
- It was very good that I had a flexible grabber tool (see below) available to get the petrified dog crap out of the tank. I don’t think there would be any other way to remove it. Certainly a high pressure hose wouldn’t have washed it out, it barely fit through the 1-1/2” access hole.
- I was a little surprised that there wasn’t more water in the tank. In fact, I didn’t have any noticeable buildup of water in the R12T fuel filter.
- Next time I want to figure out a way to pivot the camera up so I can look at the top of the tank. Rick Dowe (on this forum) reports he used a mirror and was able to see that baffles were hanging down from the top. I think that's true but I didn't see them. I’d like to get some good photos of those for reference.
Videos
Last edited: