• Welcome to this website/forum for people interested in the Morgan 38 Sailboat. Many of our members are 'owners' of Morgan 38s, but you don't need to be an owner to Register/Join.

Cap Rail refinishing question

moltzvt

David Moulton
5496[/ATTACH] 2015-04-30 10.03.52 (1280x960).jpg 2015-04-28 17.43.30 (960x1280).jpg 2015-04-30 17.24.44 (1280x960).jpg 
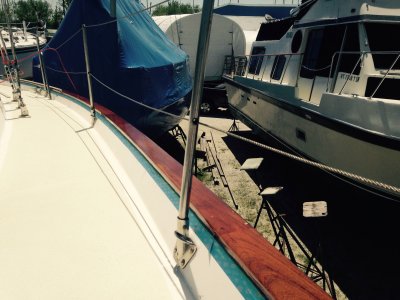
I did some searching on the site about finishing and have a few questions. I am going to varnish, I love how it looks on a sister boat on the lake. I know what most will say and maybe I will learn the hard way. I know it took some time for the sanding to come out to my liking, the better part of 2 days so now I want to get it right. I removed the aluminum rub rails and cleaned up all surfaces including the pesky underside. my plan was to add three coats of finish and reinstall the rub rails and continue with more coats. How many coats? I have heard of 6 to as many as 12. Should I sand the aluminum rub rails with a fine paper to assist in some adhesion? What little I know of varnish is preventing water infiltration underneath, Should I treat the screws with a silicon or some sealer when I reattach the rails? The finish I am using is fairly flexible for a while and that might be enough after adding coats over the top of the rails. When complete should I consider a calking on the underside between the fiberglass and the finished teak? I am going to attempt to make this finish last and keep after and spots that appear in addition to going after and possible infiltration sites.
 
Hi David - we completely stripped our exterior teak last fall first using heat guns, then sanding (3 different grits), then acetone. We wanted a professional looking finish (you probably don't want to hear this) and the whole process took around 3 man-weeks of labor*. It was a lot of frigging work. The previous work had been fairly sloppy so we were also spending a lot of time cleaning up old stuff.

Applying the new finish took only 5-10% of the time and 90% of the time was getting the wood properly prepared. When I look at your pictures, there are a lot of darker swatches that we would attack again with sandpaper - the darker swatches are usually remnants of the old finish or previous water intrusion.

It now looks really, really nice and we get a lot of compliments. I'm still not sure it was entirely worth it ... although with time, we should forget how much work it really was. Our fervent hope is that we never need to strip it down to bare wood again, and regular cleaning/maintenance coats will keep it looking nice.

We used 2 coats of Cetol Marine Natural Teak, then added 2 coats of the Cetol Gloss on top of that. We think most people won't know the difference between the Cetol and Varnish. People get into religious wars about varnish versus other products but for us, we were attracted to the nice varnish-looking finish with a less work. I can understand if someone wants real varnish, too. I do think that Cetol has gotten a bum wrap in some cases where it wasn't properly applied.

We went to a varnish seminar at Seattle Boat show last year and they were saying a minimum of 10 coats of varnish.

Since you've taken the rub rails off, I would think you'd want some coats of varnish under the rub rails to help seal the wood. I was advised to not take the hardware off since it would be very difficult. Your approach does seem more thorough.

Good luck! Let us know how it goes. Just remember: It'll look really nice!
Thanks,
-Mark

* For those unfamiliar with 'man-weeks', 3 man-weeks means 120 hrs of labor. 1 person working for 3 weeks, or 3 people working for a week.
 
David,

Do you have any interior leaks that seem to originate from the underside of the cap-rail / hull deck joint? Or drip from fasteners along the hull deck joint? Or that run down along the interior of the hull?
Pilgrim had leaks of this nature in the pilot berth area, behind the electrical panel, and in the quarterberth area. The leaks were caused by water running between the teak caprail and the fiberglass hull/deck joint. The water entered at poorly installed bow cleats, bow pulpit stanchions, and a failed seam behind the rub rails. Since you have removed to rub rails and stripped the wood not is the time to address any apparent issues.
  • Inspect all hardware mounted on cap rail to ensure it is properly bedded. Removing it now for repairs will only make your re-finishing job easier.
  • seal any gaps or openings in the joint between the upper and lower pieces on the cap rail.
On Pilgrim the majority of water finding it's way under the cap rail was doing so via the butt joint between the two pieces of wood. I can see from your images that some areas of this joint are opening up. Pilgrim's looked much worse than Namaste's. Ours were so bad we resorted to removing a section of teak and gluing splines onto the joint. Check out our blog posts on the project...
Minor joint failure, as it appears you have in some of the images, could be remedied by using a syringe to inject thickened epoxy into the opened seam. Fill any extra or loose screw holes in the cap rail while you've got the syringe loaded up.

Are you certain the rub rails are aluminum and not stainless steel? Aluminum is a rather soft metal and would be a poor choice for a rub rail.

From you description above it sounds like you plan to re-install the rub rails then apply varnish or Cetol over the rail... correct? Perhaps I misunderstood your intentions. Best to avoid applying a wood coating to a metal object. Why not complete all the coats on the wood, then re-install the rail. This will make it much easier to apply the coating while keeping the coating off of the metal.

Keep silicone products away from the bare wood! If any silicone comes in contact with the wood then it will be very difficult to fully remove. The residual silicone will prohibit the varnish / cetol from bonding with the wood. There are very few good applications for silicone on a marine vessel. Best to use butyl tape, 3M's 4000UV, or a similar Sikaflex product when sealing or bedding above the waterline.

Don't forget to metal polish the rail prior to re-installing. Much easier to polish while off the vessel. I highly recommend Collinite Metal Wax. If you really want to go all the way then use a buffing wheel on an bench grinder to polish both the rub rail and the screw heads.

Per application and number of coats - follow the instructions on the product to the letter. You are conducting a chemistry project. The manufacture has spent a great deal of time figuring out how best to apply their product.

Good luck and keep posting updates so we can follow along with your progress.

Jeff
 
Not a problem, Jeff. I really like your improvements (and photo documentation of same) to Pilgrim. You do great work, sir!
 
David,
As others have said the issue in retaining varish & Cetol (or others) is water migration into the wood and under the finish. An issue with any old boat is popped & loose bungs. Unless you recess the screws and rebung its a great way to ruin all your work. I see a lot of unbunged screw holes in the pic's. They all have to be corrected. Some mix epoxy & teak dust when rebunging is impossible. The toerail is a tough place for varnish. Wear and tear, bungs, flexing from dock impacts, standing water aft of the cockpit seeps underneath, and the inside edge peels. It makes it a biyatch on my boat to keep the finish up.

Like Mark, my 2 cents - go with Cetol natural teak (2 coats) and gloss if you want. Reapply a fresh coat every year. Varnish there will make you crazy.
Then varnish the coamings, companion way, and hand rails. The boat will still POP visually and you can sail instead of varnish.
Dave
 
Hi David - we completely stripped our exterior teak last fall first using heat guns, then sanding (3 different grits), then acetone. We wanted a professional looking finish (you probably don't want to hear this) and the whole process took around 3 man-weeks of labor*. It was a lot of frigging work. The previous work had been fairly sloppy so we were also spending a lot of time cleaning up old stuff.

Applying the new finish took only 5-10% of the time and 90% of the time was getting the wood properly prepared. When I look at your pictures, there are a lot of darker swatches that we would attack again with sandpaper - the darker swatches are usually remnants of the old finish or previous water intrusion.

It now looks really, really nice and we get a lot of compliments. I'm still not sure it was entirely worth it ... although with time, we should forget how much work it really was. Our fervent hope is that we never need to strip it down to bare wood again, and regular cleaning/maintenance coats will keep it looking nice.

We used 2 coats of Cetol Marine Natural Teak, then added 2 coats of the Cetol Gloss on top of that. We think most people won't know the difference between the Cetol and Varnish. People get into religious wars about varnish versus other products but for us, we were attracted to the nice varnish-looking finish with a less work. I can understand if someone wants real varnish, too. I do think that Cetol has gotten a bum wrap in some cases where it wasn't properly applied.

We went to a varnish seminar at Seattle Boat show last year and they were saying a minimum of 10 coats of varnish.

Since you've taken the rub rails off, I would think you'd want some coats of varnish under the rub rails to help seal the wood. I was advised to not take the hardware off since it would be very difficult. Your approach does seem more thorough.

Good luck! Let us know how it goes. Just remember: It'll look really nice!
Thanks,
-Mark

* For those unfamiliar with 'man-weeks', 3 man-weeks means 120 hrs of labor. 1 person working for 3 weeks, or 3 people working for a week.
Mark,
Thanks for the information. Now I don't feel bad about the 2.5 days it took me. I did realize the remnants of deeply routed finish in the dark areas. Having done some other areas I was not unhappy with the darker tone and was not ready to loose more wood to sanding. It already looks so much better than the dark flaky multiple layers of dull and pealing finish. I will go for the multiple coats and likely reinstall the rub rails after completed.
 
Steve, thanks I had read Jeff's section.
Jeff, Some good advice, I will be rebidding the cleats and fittings as I found some loose areas and no sign of old bedding. Namaste is the driest boat I have seen, not that I have a lot of experience. My trip with her from Rock hall to Lake Champlain only yielded a bit of dripping from the packing. There seems to be some moisture in the forward area under the chain locker but no other wet areas that seem to be from the cap. I will fill the small void between the teak sections, some have a slight separation as you noticed but most are tight. There had been a repair job on the transom as this is all new fiberglass, the cap did not go back all that well and it is here that I notice the bigger gaps. I seem to have read in a post search that some of the rub rails were aluminum and I agree this is not the best material, some areas have had major abrasion. I will leave them off and wait to reinstall. Thanks again for all the info.
Dave
 
On my boat hull # 12 I found leaks in the area behind the port lockers and stb pilot berth. I found one area around the port mid ship cleat at aft upper corner where there was on small opening in the hull to deck seal.
What I found that was surprising though was that 50% of the screws holding the genoa track on were completely loose or finger tight. Leaks at many of them were the real issue. A pain in the butt to get to, but on older boats are well worth taking a look at. Although the hull to deck joint is screwed and bonded together, the boat is 30 plus years old and those screws and nuts for the genoa track also hold together a critical high stress area.
 
David,
Your finish looks really nice. We removed our finish by sanding a couple of years ago and it was just brutal work... we removed the rub rails and then used Cetol and if I remember correctly we did either 6 or 7 coats; that's what I had read somewhere and the nice thing about Cetol is that you can do it without sanding between coats or at least that's what their literature says. We made the decision to use Cetol because it lasts longer than regular varnish. I had used varnish on my Lazarette hatch when I first bought the boat and I was re-refinishing it in no time; anything that gets any kind of foot traffic or sheets slapping it, dock lines, etc., etc. needs to be pretty durable; so far, I have some wear spots on the outside edge from boarding the boat and some rub thru where the line holding the bumper/fender creates some friction. The nice thing about Cetol, at least according to what I read is that the repair process for that damage to the finish is that you just lightly sand on it and then put Cetol back down, then put your layers back on... at least that's what I read and so far, it's holding up quite well; we're happy with it. And I'm in Central Florida, Gulf coast where it's hot, damaging UV, etc. etc... so far, it's holding up very well. Be sure to tape up well, because it's tough to get off gelcoat if it drips somewhere and you don't see it right away or it gets behind the tape!
 
2015-05-24 10.38.51.jpg 2015-05-24 10.38.46.jpg 2015-05-24 18.57.23.jpg Lots of great feedback from all, thank you. I completed my prep work this weekend and launching this week so had to finish up. I have 5 coats of Waterlox marine grate high gloss, we will see how it works out. I will add additional coats where I can but had to reinstall the rub rails and peel the painters tape. After 3 weeks the tape was due to come off, note ( don't purchase the slightly cheaper Home depot tape, its good for maybe 10 days. I decided to plug all the cap rail screw holes with butyl tape, they are hidden under the rub rails in any case but hoping to avoid another water infiltration spot. I am seriously considering some sort of sealant where the wood meets fiberglass to prevent another water route, I know its not traditional but I'd rather be sailing... Not sure why Morgan decided to use aluminum rails , if I had the funds I would replace with stainless but that's another day.
 
Cap/rub rail - I pulled my metal rub rail off to start a major refinishing of the teak: Strip multiple layers of Cetol Nat.Teak...we all know the drill.
Like Jeff & Lee, I found split wood and the start of some rot in places. The metal rub rail hold moisture in the joint between cap & lower rub rail. This is very bad.

If Mr. Lovett was nearby, I'd have him apply his teak strip filler technique if he was willing. However I have no supply of teak/saws etc. nearby. Instead I am cleaning the groove as best I can with tools available and applying West & filler to keep the water out. (Jeff - how did you control a circular saw? It wasn't a 10 incher was it?)

I'm posting this because I suspect there are a lot of Morgan 38's suffering the same fate. The cap rail seems to sit on a plastic sheet with a sealant. I'm not sure there's anything between hull and the lower rub rail. But the problem here is water in the space between top & bottom wood as seen in Jeff's pictures.

Once we refinish the wood I'll load the metal rails up with a good sealant. My metal was new 5 yrs ago and Taco's installation suggested just a dab of silicone on the screws during install. I went wrong there by not using more sealant initially. Teak won't rot, right? Anyway - fair warning to my fellow Morgneers on this trouble spot.

PS - Jeff, smart choice on "going gray" with the teak!
Dave
 
Thanks Dave. Good luck with your project and keep us updated on your progress.

I used a circular saw with a fresh 7-1/2" diameter blade to make the cuts freehand. The tool that really make it feasible to make the long, straight rip cuts was scaffolding with walkboards.


We set up four sections of scaffolding with walkboards along the hull. I was able to walk along with the saw at chest level while making the cuts.

I do not believe Pilgrim has ever had any sealant / caulking between the hull the the lower section of teak. I considered filling the joint with 3M 4000 or similar, but ultimately decided to leave the joint open. When the vessel is at rest this joint is facing down towards the water. I believe that some amount of water will always find a way to gain access to the area between the teak cap rail and the fiberglass deck / hull. My hope is that leaving the outside intersection of the teak and fiberglass hull free of sealant will provides a path for water to escape.

On Pilgrim the horizontal joint between the caprail and the deck does have a bead of some caulk / sealant that was applied by a previous owner. I believe sealing this intersection is necessary to prevent water intrusion between the teak and fiberglass.
 
I have rub rail question. On my boat (384 hull #1) there was resin filler between rub rail and teak cap rail.
I think it was designed to make rub rail more resistant for bumping against hard objects.
Did anybody find replacement ?. I may end up cutting 3/16 fiberglass strips to fill the gap.
Yurek.
 
Jerzy, Is your stainless steel (SS) rub rail concave on the backside or is it solid SS with a flat backside?
 
Yurek,
Solid rails are definitely preferable. Pilgrim, 1979 M382 hull#115, also has hollow, concave SS rub rails. Factory did not attempt to fill them with resin.

Let us know how you decide to proceed.
 
So far I have elected not to replace the rub rails. This decision was made easy by Hurricane Ike, I had to replace almost all of the rail. Since I am not planning on Marina cruising I see little need for these. A good fender board is better.....
 
I had a question from a member regarding the space between top and lower section of the Cap rails, something Jeff Lovett explained well in his cap rail work. I decided to add my follow up to this post for what its worth a year or more later.
My hull # is 271. The rub rail I have is aluminium and had no issue putting it back on. There was a slight separation between top and bottom sections and most I filled. I would suggest using 5200 sealant, it will all be behind the rail in any case. I did use butyl tape on all screw holes, be careful to use small pieces so they do not show above and below the rub rail.
Some things I have learned after 1 year.

1) Any place there is a joint there will be movement and the bond will be lost and moisture penetration seems inevitable. Being in the norther climate, where extreme temperature changes occur, I noticed all the issues after the winter storage season. I suggest routing the stern corner joints and any other wood joints after all the sanding is done, fill with some flexible sealant. I think this is what Jeff L did on his rails.

2) Make sure you have plenty of coats of whatever you decide to use, 2 or 3 coats is not enough. The places where I had 6 to seven coats held up very well, the odd areas where it was less and appeared good to the eye, were not, the grain voids were not filled enough and water penetrated darkening the grain. I used Waterlox marine and I am still happy with it. The areas where water infiltrated were not due to the sealer, a penetration or joint caused the issue. Knowing what I know now I should have removed all the stern railings and bedded them with Butyl tape as well. Most of them held but some failed. Last week I sanded down the areas, the finish was still flexible and gummed up the sanding paper, this I feel is a good thing so some movement or impact will not penetrate. after sanding down the areas I re-coated, there is a very minor color difference. The quicker you get to this the better. It took just a few hours and I will be adding coats as I return to the boat.

3) When you finish all your hard work keep anyone from coming aboard with sand or pebbles on their shoes, or better yet, no walking on the teak until footwear is removed. Not as much of an issue on the mooring where I am, as by the time they reach the boat the dinghy has whatever they had on their feet.

4) In the spring prior to launching, wash you teak, sand lightly with 200 or higher and add another coat. It will look like new again and help protect for another season.

5) When I finished this work the yard did not bumper the lifting straps and although the last coats had gone on over a week prior, the finish remains soft and was damaged in the 4 spots the straps rubbed.

6) Consider not using a finish of this type unless your prepared for the work ahead to maintain it. It sure looks good and I got what I was after but I am not sure I would go down this road again. Besides, gray is not so bad.....
 
Last edited:
I completely removed that teak piece under the cap rail , Yes mine was not sealed and water trapped had caused ROT ! I used a wood they use in Florida to build docks , its called IPE a Brazilian hard wood . Its hard cheep and does not float. I used screws and west system epoxy on the underside and against the hull. All old screw holes were west filled and all new ones were drilled. When done , I used 5200 applied to the back side of the hollow SS Rail . My wife and i worked for a week with the boatwright to Apply the new wood . This cut the cost by 50% at the time my cost was under 3 K . Its done right and very solid . As i remember The Ipe was cut one inch by one inch in 12 ft sections , It bent to the hull more than i thought it was going to . !
 
I've gotten into refinishing the cap rail. I has a section that was damaged when I purchased the boat. The seam of the aluminum rub rail caught something and bent it out a bit plus smashed the teak piece under the cap rail. So I thought what I thought was going to be a simple job has turned out to be bigger than I thought. When the rub rail was removed, it exposed about a 6 foot section where the piece under the cap rail is rotten. Anyway, I'm plugging away at removing the finish and trying to find a carpenter to replace about a 6 foot section.

I have one question. I have a small bead of what appears to be silicon caulk running where the piece under the cap rail meets the hull. Is this suppose to be here?. Seems to me that all it is doing is trapping the moisture in that gets behind the rub rail. Appreciate any wisdom any one has.
 
No, I don't think that silicone is supposed to be there. The issue with holding any finish on is water getting underneath. The horizontal joint where the cap meets the rub rail has (more correctly: had) a tape like caulk sealing between the top (cap) and side (rub) rail. The caulk has long dried out... lets water enter the grain of the rub rail. Rot starts when it can't dry out. Then there's where the bungs over the screws let water in. Stop the water migration or you get to refinish the wood every year. There's probably not enough "meat" left in the wood to stand yearly sanding anyway. Its the "pay me now or pay me later" old boat conundrum.

Jeff Lovett did it right, cutting out the seam larger and filling it. Check his post in this thread. I gouged out as much as I could with hand tools, injected and putty knifed, (to fill the gap) with west epoxy and filler. Mixed epoxy and teak dust to fill the popped bungs. Then I refinished the wood. Sort of a halfway repair that's holding up so far... 3 years..

So my advice is stop the water intrusion first. Its a big job to repair properly... IF you're trying to sail this season. The season's short in "the great white north".
I envisioned pulling at least the rub rail off completely to renew the caulk on the vertical & horizontal surfaces, fix some of the punky wood, recess screws deeper to hold bungs. I put it on the "to do" list for another time. It really depends on the boat's condition and where your preferences are at time & money wise. Good luck/ Dave
 
Dave, thanks for the information. Looks like I will be sailing the rest of our short season without the rub rail on. think I will just focus on getting the rotten section fixed and removing the old finish and now the silicon bead along the hull. When I haul out in September, I will remove all the hardware, clean out the groove and epoxy. Do the final sanding and apply the finish. I store inside so I don't have to worry about the weather all winter.
 
If you choose to epoxy bungs in place you will never be able to remove them if necessary . A little varnich around a new bung is enough to seal it in place and make it water proof. And removal is a screw in a electric drill in reverse . The plug walks right up the screw ! I do agree with a touch of epoxy on the screw threds making it water proof.
 
Lee, I agree. Epoxy & teak dust where the bungs are gone. That's semi permanent, but can be drilled out. Sand flat, varnish or whatever your "poison" is. Epoxy & filler in the seam.
 
When you guys redo teak cap rails after stripping heat gun and scraper Just try" Snappy Teak NU" its a teak oil remover . I have been using it for 20 some years works in 30 min just was removes the tek oil. Teak will turn black while teak oil comes to the surface than part B restores the color. When dry I used Cetol Natural and least 80% thinner first coat than 2nd coat same day 20% thinner and cetol, Than 10AM and 2PM coats till 8 coats than 2 coats of clear gloss cetol the Gloss has more UV. Than every fall one more gloss coat to protect the 8 from Sun .
There are now 3 other boats in my marinia that copied my system after seeing my result . Makes sunch a difference to walk down the dock and see
owners taking care of there boats again. and they look like new again. One has even used the Island Girl wax on ther hull and at 34 years old she looks new again.
 
Lee, I have removed one rotten section of the piece of teak under the cap rail and will probably replace another one. The one I removed is on the back starboard side and is about 6 feet long. Anyway, the question I have is that there appears to be a small channel in the fiberglass behind the piece of teak I removed. It appears to be filled with a reddish looking substance. I will need to clean out an refill the channel. Would you use a bedding compound like Dolfinite or caulk?
 
The redish stuff is a marine bondo of sorts. I filled all the old holes from the rotten 1x1 with 6 !0 epoxy . I drilled new holes Epoxy tipped the new screws and 5200 the back side to the hull and sealed to the cap rail. You dont ever want to do that section again.
All the rest of that 1x1 is not bedded in any way, leading to more wet and rot. If it were me i would rebed the whole 1x1 section now that she is out of the water.
best of luck
 
Dont forget to add" Flowtrol "for oil to the varnish. It adds flow propertys to the varnish. adds to a mirror finish. Home depot or the like. Comes in latex or for oil paint . Ask any pro painter
 
When we put back the SS rub rail after polishing it up on the work bench , we filled the back side( concave ) with 5200 ! Its as solid as Sears used to be !!!!!
 
Back
Top