• Welcome to this website/forum for people interested in the Morgan 38 Sailboat. Many of our members are 'owners' of Morgan 38s, but you don't need to be an owner to Register/Join.

holding tank woes

schlepper

John m. Harrison
I've owned Tranquility now for about 3 1/2 years and love the boat. One annoying problem is the bilge always has about 2" of water in it that the bilge pump just won't kick out. The source of the water is the a/c condensation drains into the bilge and as well, the small trickle that comes from the rudder. I just cannot get it tight enough to completely seal. There is some pitting on the shaft where the gland would seal and that is the likely source.

However, I have suspected the holding tank or plumbing somewhere along the line has an issue because if you flush, it smells for a few minutes and then goes away. I figured it was the vent line. I tested that and it was ok. I never got up the wherewithal to check the pvc pipe runs and then the down angles pipe to hose connections to insure that wasn't the source of the odor.

I finally took all of that on this past weekend.

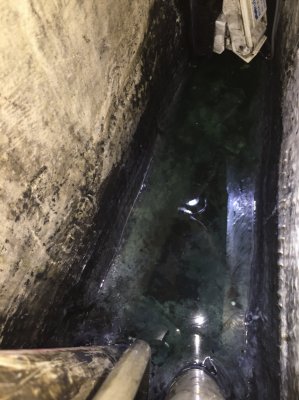
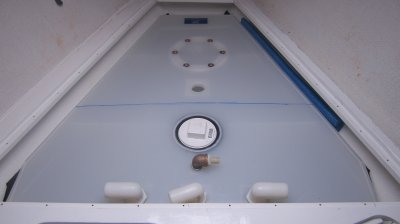
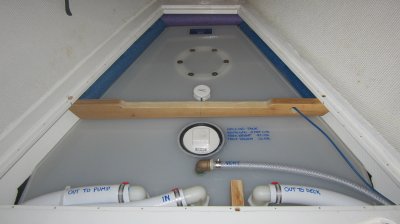
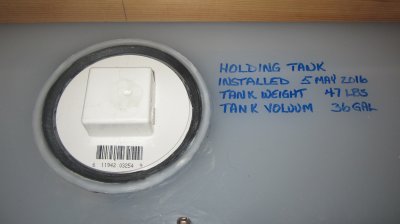
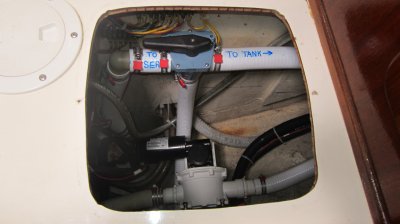
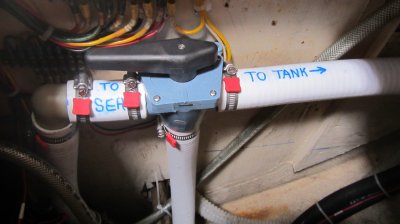
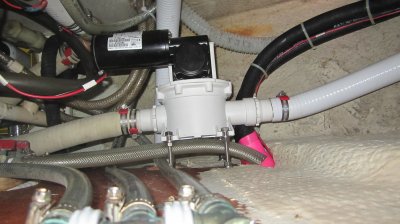
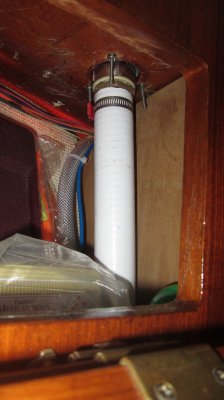
Here is what i found: the pvc pipe run was water tight; no leaks although one of two hose clamps from head to pvc pipe was defective so I replaced it. I checked the elbow joints. No leaks. no i was narrowed down to the tank itself so I hand pumped all water out of the bilge and then pumped the head. To my utter dismay, the bilge had water in it again. I was by myself so where/how to see where it is coming from? There certainly doesn't look like any cracks or defective cloth/resin seems visible to my critical eye. So I set up a video with my iPhone. What I found really is frustrating. The tank is leaking aft, in what appears to be 2 or 3 places, all on the starboard side. one smaller leak and one big one. the first one is about even with where the macerator outgoing pvc pipe is that's molded into the tank top plate. The second leak is about halfway back.

In looking with he naked eye, i cannot see the defects but have to get a mirror down in there to see it better after cleaning it with some acetone or something to remove the oil film and grime off of it.

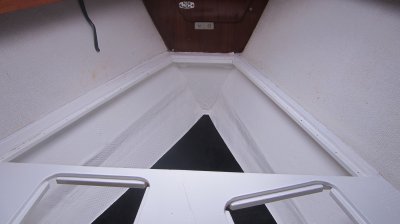
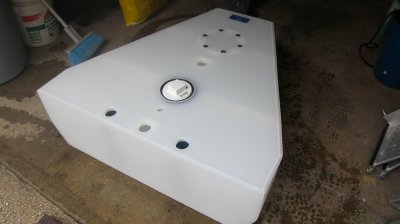
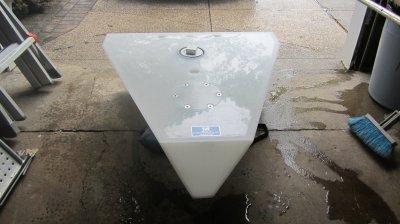
Has anyone ever successfully patched this type of leak? Can it be done from inside the boat or does it necessarily entail hauling the boat and having a hole cut in the side of the tank, to patch from underneath? I want to exhaust the options to fix the tank as is before resorting to moving the tank to the forward water tank area, or to the head sink area, or the storage area under the salon settee....

Thanks and please advise,

John
 
here is a picture of the area in the aft bilge where the leak is occurring. In this picture it is on the left/starboard side of the boat.
 

Attachments

  • IMG_6098.JPG
    IMG_6098.JPG
    874.1 KB · Views: 101
John,

Bummer.

I faced a similar issue on Pilgrim, 1979 M382 Hull# 115. I choose install a prefab plastic holding tank under the head counter top and consolidate all the back water plumbing to the head.
Here is a link to a photo album documenting the project....Holding Tank Install

Tom Kulberton owner M382 Williwaw replicated my installation and is very pleased with the results.

If you are not interested in relocating the holding tank, then I feel you will achieve a better repair to the existing tank by hauling the boat and going in via a cut out in the hull. This will also allow you to fully inspect the holding tank. You may discover additional issues. I recommend applying an epoxy barrier coating to the fiberglass interior of the tank while you have the access.

Good luck and keep us updated on the progress.
 
Thanks Jeff.... we've had the problem since I bought the boat but never took the time to track it down... we're mostly day sailors and then back to the marina but a weeklong trip we took the first of this month and it was apparent that we need to fix it once and for all. I would love to keep it where it is so that all the wiring, plumbing, macerator, etc. all stays as is.... but if it's a roll of the dice on the fix.... maybe it does need to just be filled with foam and moved as you did. I do like having it close to the head itself so less hose runs which means less areas to become problems for leaks, hose replacement, etc.


I was curious if anyone on the board had actually had the stock tank fixed and if they did, how did they do it and has it lasted? I suspect faulty blocking at haulout is the culprit of these particular problems although I can well imagine that flexing of the hull, etc. possibly could cause it...
 
John,

If you do elect to move the holding tank. I do not recommend simply filled the original void with foam. I contemplated filling the void with foam. After consulting with a couple "professionals" decided this to be unwise. There is no method of assuring the foam has completely filled the void or of preventing water from weeping down between the foam and the interior of the hull. This trapped water could lead to blistering and other issues. This also leaves you with an area of the hull that if damaged or breached is totally inaccessible from the interior of the vessel.

The two options I saw were...
  1. fill the void with epoxy or some type of solid material with epoxy poured around. This is vastly too expensive and could unbalance the vessel depending on the weight of the material.
  2. open up the area and incorporate it as a deep bilge.

I choose the latter of the two options. Here is a link to a photo album documenting this project.... Bilge Modifications.
 
Jeff,
This is awesome.... I will look into that.... waiting on call back from a boatwright to see what they say about patching versus relocating. I like the option of creating a deeper bilge so you can see what's going on in there if you need to.
 
I have it on video but i can't get it to load here. You can hear in the video me pumping the head manual handle and plunger and as soon as it makes it's way down he PVC pipe to the already full tank, you see it gurgle out top of the bilge floor.... so it doesn't seem that it could possibly be outside water but instead, water already in the hold tank.
I guess it's possible the hold tank is compromised a bit to the outside but if it is, it doesn't seem to be enough to force it's way past these leaks and into the bilge at least not at this point.
Do you have a link to your video maybe...YouTube?
 
i'll try to upload it tonight and post back on here.
Okay...I'm curious as to what it looks like. I think someone else had a similar issue. It turned out to be something else...not as bad.
Are you on salt or fresh water? You Gould check for salt water. You can also use dye to check for the source(s).
 
Jeff,
This is awesome.... I will look into that.... waiting on call back from a boatwright to see what they say about patching versus relocating. I like the option of creating a deeper bilge so you can see what's going on in there if you need to.
Be sure it is someone familiar with the Morgan Holding Tank...not too many are even if they claim to. Ask a few questions to test them before letting them mess with it on your time.
 
Be sure it is someone familiar with the Morgan Holding Tank...not too many are even if they claim to. Ask a few questions to test them before letting them mess with it on your time.
The video is not unlike what we have seen before. I believe there are a few "holding tank" experts on the forum.
There, if I remember correctly, is a overflow/overfill pipe on top of the tank. Guess where it empties? sometimes?! I forgot what was done to remedy this. Maybe someone will chime in. Yes it could have a crack or two at the top. The top could be dried, acetone, export paint filled. Jeff would know better.
 
I would bet 95% of the problem with bilge floor is due to improper blocking when the boat was hauled. My vote is to empty the holding tank, dry the floor thoroughly, grind and reglass.

Blocking the Morgan under the holding tank is a big mistake. The owner should be there and make sure the yard understands the design. There are even diagrams on this site showing exact blocking placement. In lieu of that, yard workers should sound the keel before placing any weight on the keel/holding tank void.
 
Jim,
When I bought the boat, i had to take it to haulout and block & stands for some insurance required work. We sounded the holding tank with a mallet. We did the same when I hauled it for bottom paint in April 2015. Although the aft most block may have been partially on the tank part, it couldn't have been much if any of it. The leak was happening when I bought it and the previous owner probably did some sleight of hand with the Surveyor and it never was mentioned. However, immediately upon getting it back in the water we had the odor issues and there was always water in the bilge both from a leaky rudder shaft and the holding tank, which I didn't know that's what was going on....

I still cannot see how in the heck there is any leak going on in there, i really don't. there is no visible crack in either spot but it is hard to see because of the galley cabinet/bilge access being off center... i wish there was an easier way to get to it without major tear out of stuff.


It's only money, and they're printing more of it every day.
 
I am just curious as to who on the board has actually gone in and had their holding tank repaired? What was done, How was it done, who did it (i.e. was it DIY or did the yard have to do it) and what materials did the trick, etc. I just have to think that a good injection of epoxy down in any crevasses and then cover it in epoxy all along there could possibly do it... or is that a waste of time and good epoxy?
 
I am just curious as to who on the board has actually gone in and had their holding tank repaired? What was done, How was it done, who did it (i.e. was it DIY or did the yard have to do it) and what materials did the trick, etc. I just have to think that a good injection of epoxy down in any crevasses and then cover it in epoxy all along there could possibly do it... or is that a waste of time and good epoxy?
That's what I've heard other people did. I know of two Morgan's set on their entire keel. Fortunately no damage to holding tank itself was fine. They probably did much more damage than yours, if what you say is true that it wasn't set hard on the aft section. The damage was just to the hollow section under the holding tank. No water came in the bilge.
Jim is right (correct) you always need to be there. I can't tell you how many times even after telling them at a yard, sending them the diagram showing where not to set it, they start to set on the entire keel or worse a block aft and we have say "Whoa!"...Stop! Being there saved it.
 
I am just curious as to who on the board has actually gone in and had their holding tank repaired? What was done, How was it done, who did it (i.e. was it DIY or did the yard have to do it) and what materials did the trick, etc. I just have to think that a good injection of epoxy down in any crevasses and then cover it in epoxy all along there could possibly do it... or is that a waste of time and good epoxy?

First... make every effort to confirm the issue is crack or failed tabbing.

If you confirm the issue is bond between the floor of the bilge and the hull, then I believe that simply injecting thickened epoxy into the crack or crevasses is a waste of time and $$.

First... To achieve any successful bond the surfaces you are attempting to bond together (vertical wall of the keel and the vertical tabbing rising up from the floor of the bilge), must be clean, dry and abraded with at least 80 grit sand paper. Cleaning these surfaces properly can only be achieved if the surfaces are exposed. Thus the existing tabbing must be ground away and the interior face of the keel/hull exposed. Then new tabbing can be added.

Second... Even epoxy thickened with micro fibers will crack when one of more of the surfaces being bonded is flexing. Fiberglass cloth impregnated with epoxy (i.e. tabbing) will accommodate the flexing while maintaining the bond. The vertical wall of the keel/hull definitely flexes in this area.

Thus I believe once the tabbing between the floor of the bilge and the side walls of the keel has failed the only long term solution for repair is to add new tabbing. Based on what I have discovered on Pilgrim, I believe the tabbing is only on the top (bilge side) of the joint. Thus I suggest removing an access panel from the keel and going in from the underside as this would not require the removal of the tabbing above. It would only require drying cleaning, and abrading the two surfaces on the inside of the tank. Additionally going in from this route will...
  • eliminate the need to do a lot of grinding inside the boat... very messy
  • provide better access for making the repair
  • allow for a through inspection of the inside of the tank and lower keel
  • allow for applying an epoxy barrier coat to the inside of the holding tank area.
Of course there are also cons...
  • requires expense and time of hauling boat
  • cutting and repairing an sizable hole in the keel is daunting. If you are contracting a yard to do the work, then choose wisely and monitor the work closely.
Or you can relocate the holding tank...?

Good luck.
 
Forgive me if I'm missing something and asking a stupid question ...

But isn't this leak only possible if the holding tank is full? So that the contents is pressuring up into the bilge when you try to pump more in?

And isn't it the case that it does not leak if you have recently pumped out?

So isn't the solution to the immediate problem just not to let the holding tank get full? Leaving the question of possible cracks for a time when you have other reasons to haul out?

Have I misunderstood the problem?

C
 
Jeff is 110% correct. The only way to return the holding tank to a non leaking condition is by going into the tank from outside the boat. Then super cleaning inside the tank and retabbing the tank top/bilge bottom from the inside. Repairing the tabbing from the bilge doesn't work. I have attempted that repair 3 times and failed. Mainly because there is limited access in the bilge to work a grinder into the area. Jeff is also correct in that the solution is to relocate the tank to a new location. He put his under the head sink, We put ours up in the v-berth. I'll be posting a group of photos of our project in a few days when the job is totally complete. Where I disagree with Jeff is in what to do with the old tank. He opened the bilge floor to create a deeper bilge. I sealed the tank off and left it with 5 gallons of antifreeze in it. My reasoning is that if the back of the keel gets ruptured in a hard grounding, there would be no access to that area to staunch the inflow. With the tank sealed, the only inflow would be weeping through the cracked tabbing which would give you time to get the boat to a travel lift.

Jim
 
Chris
You are correct. Two things happen with the leaking tabbing. If the tank is full, the pressure from the head pump will force the contents up into the bilge (stink). With the tank less then full and the bilge having a liquid level above the height of the crack, then bilge water will fill into the tank. That means more pump outs and never knowing how much is in the tank. So if you never fill the tank or if you never let the bilge fill with water above the crack then the crack should not become an issue. Bonnie and I gave all this a lot of thought and decided that we'd rather not have to do that much thinking. So we went with the new tank.

Jim
 
Jeff is 110% correct. The only way to return the holding tank to a non leaking condition is by going into the tank from outside the boat. Then super cleaning inside the tank and retabbing the tank top/bilge bottom from the inside. Repairing the tabbing from the bilge doesn't work. I have attempted that repair 3 times and failed. Mainly because there is limited access in the bilge to work a grinder into the area. Jeff is also correct in that the solution is to relocate the tank to a new location. He put his under the head sink, We put ours up in the v-berth. I'll be posting a group of photos of our project in a few days when the job is totally complete. Where I disagree with Jeff is in what to do with the old tank. He opened the bilge floor to create a deeper bilge. I sealed the tank off and left it with 5 gallons of antifreeze in it. My reasoning is that if the back of the keel gets ruptured in a hard grounding, there would be no access to that area to staunch the inflow. With the tank sealed, the only inflow would be weeping through the cracked tabbing which would give you time to get the boat to a travel lift.

Jim

Jim,

Thanks for your perspective. I look forward to seeing the pics from your holding tank install.

The anti-freeze in the void is a good idea. If the failed seam between the bilge and the tank still exists, then is the bilge water filling the tank void? I think this stagnate water will begin to stink over time.

Also is is my understanding that standing water inside a hull can lead to blistering. This is the reason I continue to promote sealing the inside of the tank or bilge with an epoxy barrier coat.
 
Not to be funny but this really "stinks" if someone has this problem.
It all seems like a very expensive nightmare...seems like a surveyor should be knowledgable about Morgan's (or at least give them some test questions) to let a prospective buyer know that this could be an expensive issue. How much are we talking here?$$$ by a reputable yard?
 
Jeff
The blistering issue is something I never considered. My thoughts with the antifreeze were that any water that finds it's way into the tank will then be kept from freezing during winter layup. I wonder if I layup some more glass mat over the area where I know the cracked tabbing is will prevent bilge water from leaking into the tank. With not using, therefore not pressurizing, the tank, I won't have to worry about stuff leaking into the bilge from the tank. That way the tank can be left dry and eliminate the blistering problem?

Jim
 
Jeff, I really appreciate your deep dive into the details of the fix for my benefit. I will probably wind up dropping a tank in the salon berth area or where you did... I don't want to do that much surgery but it is looking like I will have to in order to have it fixed completely properly... everything I am doing on the boat I am trying to 'do it right' or restore to stock as there have been a myriad of nagging small things that previous owner(s) did that are really annoying when you take them in their totality... even still, I love this boat. All of my friends are shocked that me, a reformed power boater, with this as my first ever sailboat, have been so passionate about working on it, sailing it, etc... The boat is kept in a slip at the Clearwater Downtown Marina on the ICW in Clearwater, Florida....slip B6!
 
Jeff
The blistering issue is something I never considered. My thoughts with the antifreeze were that any water that finds it's way into the tank will then be kept from freezing during winter layup. I wonder if I layup some more glass mat over the area where I know the cracked tabbing is will prevent bilge water from leaking into the tank. With not using, therefore not pressurizing, the tank, I won't have to worry about stuff leaking into the bilge from the tank. That way the tank can be left dry and eliminate the blistering problem?

Jim

Jim,

Did you cut out a section of the bilge floor? Or pour the antifreeze down one of the existing PVC tubes? By removing a portion of the bilge floor, it is possible to clean the inside of the tank, sand the interior (somewhat), and apply a barrier coating. After the barrier coating is cured then using butyl-tape for bedding and wood screws as fasteners affix a section of FRP paneling over the access opening. Then you would have the piece of mind of a "crash" barrier and will be able to open up the access and remove any standing water prior to winter lay up.

Here is what the interior of Pilgrim's tank looked like after I removed the standing water and scrubbed it a multiple times with TSP.


The cracked surface on the bottom appeared to be a layer of unthickened epoxy poured in a the factory. I'm not sure why this was done. Perhaps just to get rid of excess epoxy.

Once done with the cleaning I sanded the area was best I could using 80 grit paper attached to various sticks, poles, etc. Wiped it all down with acetone. I then spread epoxy thickened to a honey consistency with a combination of micro fibers, cabosil, and barrier coat additive across the "floor". This was done to fill in the cracks and create a relatively smooth surface. I then rolled on 5+ layers of epoxy barrier coat to the entire tank area. To be sure I could not see everywhere in the tank so there are likely areas that did not receive a full coat each time. Fortunately I did have a relatively good visual of the floor and lower section of the tank where water is most likely to accumulate.

The best image I have of the lower bilge (former holding tank) has the lower two bilge pumps installed. It is still possible to get a reasonable idea of the surface finish I was able to achieve.

View media item 531
 
Jeff, I really appreciate your deep dive into the details of the fix for my benefit. I will probably wind up dropping a tank in the salon berth area or where you did... I don't want to do that much surgery but it is looking like I will have to in order to have it fixed completely properly... everything I am doing on the boat I am trying to 'do it right' or restore to stock as there have been a myriad of nagging small things that previous owner(s) did that are really annoying when you take them in their totality... even still, I love this boat. All of my friends are shocked that me, a reformed power boater, with this as my first ever sailboat, have been so passionate about working on it, sailing it, etc... The boat is kept in a slip at the Clearwater Downtown Marina on the ICW in Clearwater, Florida....slip B6!

John,

You are welcome. I really believe installing a tank in the head or under the vee berth is the best solution. This will also give you the "opportunity" to replace all the existing black water & head plumbing. If any of it is still original, then replacement is definitely due.

Good to hear you love the boat. It is hard to fathom how much time and effort I have put into Pilgrim without ever sailing her. Thankfully this winter I was able to join Rolf for a few weeks aboard his M382, Sjokolade. I enjoyed my time aboard the vessel and am eager to the day Pilgrim and I can set sail.

I was asking about your location so that I may be able to assist in recommending a yard, but I am unfamiliar with your area.
 
Jeff, thanks again and I appreciate the concern. If ya'll are ever in my area of Florida, would love to take ya'll sailing. Lee Nicholas is just up the road from me in Tarpon Springs and I used his recommendation for a yard last year to get the bottom job and dropped the rudder, replaced the stuffing box tube and packing and cutlass.... my rudder packing continually has a slight leak as there is some pitting on the shaft where the gland seats so some water invariably gets around it... we tried epoxy but that works so-so... Other things I've done to it so far:

rigid boom vang (Garhauer)
CPT autopilot
new bimini and dodger
repainted topsides non skid with awl grip 'Moon Dust'; the Interlux fine non skid everywhere except cockpit (sandblast sand) and anchor area with a coarse non-skid)
had spare main halyard rigged and set
lewmar self tailing winch on main halyard
rebuilt the Galley oven/stove Force 10 and it is an awesome unit!
new blowers and hose in engine room, one in and one out
new bilge pump and hose
a/c installed
new refrigeration (air cooled)
new North mainsail
NFM port lights
replaced crazed fixed clear ports at Galley and Chart table with dark tinted replacements

I've done nowhere near the work you have and I've got a long way to go but this holding tank issue has got to get resolved.
 
John, unless I missed this, do we know (yet) if you have outside water leaking into the tank OR "just" a leaking HT/bilge floor?

If you have an external leak you might want to get that repaired right away. How about you pump the HT out and see if there is no leak (until the HT fills with seawater).
Another tactic with an empty tank, could be to add water to the bilge above the tabbing. Does it drain quickly into the HT?
With bilge filled above the the tabbing, I pressurized my tank (slightly) by pinching the HT vent hose closed and pumping the head. I was able to see bubbles rising from the tabbing.
You might be able to determine how badly compromised the tabbing is. Or if you see bubbles rising outside the hull.... Personally I'd be concerned with water entry issue. Something's not right.
 
Jeff
I like the idea of opening the tank, cleaning it, painting it, then reseal it again. Unfortunately, or actually fortunately, the boat is being splashed tomorrow morning. So that project will have to wait till the fall of 2017 when we haul again.
My fear of the keel being ruptured is based on the experiences of a very good friend many years ago. At a local boatyard a man was in the process of buying a 1960's vintage LeCompte 38. His surveyor found a couple of issues that needed to be resolved. The owner of the yard took the boat out for a trial run to determine if the issues could be taken care of. As he was bringing the boat back into the harbor he hit a rock that tore the aft end of the keel off. Because a water tank was blocking access to the hole in the keel, the boat sunk! Quickly!! The insurance paid the 60K loss to the new owner, and the boat was auctioned off as is. My friend then purchased the boat from the insurance company for 12K. With additional K's added to the project he ended up with a beautiful vessel that we eventually sailed from NY to Bermuda. So you can understand my reluctance to open that tank to the inside of the hull.

Jim
 
Dave,
I had suspected a water leak from the outside over a year ago and when we did the haulout to do bottom paint, replace cutlass, shaft packing tube, etc. and, no water leaked out of the holding tank while it sat on the hard. I had put food coloring into the water in the tank and none seeped, weeped or leaked out. I plan to get back down to the boat tomorrow night (2 1/4 hours away from home) to see if I have any water in the bilge. The rudder, prop weren't leaking when I was on the boat last Saturday and the a/c is off so no evaporator water, which drains in the bilge, will be going in there. There should be no water in the bilge when i get there tomorrow night. If there is, then maybe I've got an external holding tank leak that then leaks into the bilge but I don't think that will prove to be the case.

Thank you for giving thought to it, and I'll post up what I find. Worst case scenario I do have an external leak and I have it hauled, patch the leak, relocate the holding tank and then all will be right with he world!
 
I have completed the installation of Dana's new V-Bunk holding tank system. Posting the photos will take a couple of posts. Photo #1 is the cutout in the v-bunk . The black at the bottom is a 1/4" thick pad to cushion the tank. Photos #2 & #3 are the finished tank before going in the boat. Photo #4 is the label for the company that built the tank. I have nothing but good things to say about them. Photo #5 is the tank in place on the boat. Photo #6 is the piping, bracing, and sensor completed. Photo #7 is the sensor for the Electrosense Monitor. Photo #8 is the clean out plug and info. Photo #9 is the T-valve from the head and the waste pump under the laundry bin in the head. Photo #10 is the T-valve closer up.
 

Attachments

  • 2016 Dana's Holding Tank-1.jpg
    2016 Dana's Holding Tank-1.jpg
    2.6 MB · Views: 89
  • 2016 Dana's Holding Tank-2.jpg
    2016 Dana's Holding Tank-2.jpg
    2.4 MB · Views: 75
  • 2016 Dana's Holding Tank-3.jpg
    2016 Dana's Holding Tank-3.jpg
    3.2 MB · Views: 72
  • 2016 Dana's Holding Tank-4.jpg
    2016 Dana's Holding Tank-4.jpg
    2.6 MB · Views: 71
  • 2016 Dana's Holding Tank-5.jpg
    2016 Dana's Holding Tank-5.jpg
    2.5 MB · Views: 72
  • 2016 Dana's Holding Tank-6.jpg
    2016 Dana's Holding Tank-6.jpg
    2.7 MB · Views: 72
  • 2016 Dana's Holding Tank-7.jpg
    2016 Dana's Holding Tank-7.jpg
    2.4 MB · Views: 69
  • 2016 Dana's Holding Tank-8.jpg
    2016 Dana's Holding Tank-8.jpg
    2.5 MB · Views: 67
  • 2016 Dana's Holding Tank-9.jpg
    2016 Dana's Holding Tank-9.jpg
    2.4 MB · Views: 74
  • 2016 Dana's Holding Tank-10.jpg
    2016 Dana's Holding Tank-10.jpg
    2.3 MB · Views: 67
Holding Tank photos continued. Photo #11 is a closeup of the Sealand TW waste pump. Photo #12 is the 1 1/2" hoses running forward past the shower faucet. Photo # 13 is the 1 1/2" hose to the new pump out fitting on deck, this is run through the small locker above the shelf in the v-bunk. Photos #14 & #15 are the Electrosense control panel at the chart table. Photos #16 & #17 are the new pump out fitting on the deck forward of the shrouds on the starboard side. I'd be happy to answer any questions. Don't mention it to Bonnie but the total cost was about $2100. I consider that a fair price to pay to double our poop capacity and to eliminate the Holding Tank Woes.

Jim
 

Attachments

  • 2016 Dana's Holding Tank-11.jpg
    2016 Dana's Holding Tank-11.jpg
    2.9 MB · Views: 79
  • 2016 Dana's Holding Tank-12.jpg
    2016 Dana's Holding Tank-12.jpg
    2.4 MB · Views: 71
  • 2016 Dana's Holding Tank-13.jpg
    2016 Dana's Holding Tank-13.jpg
    2.6 MB · Views: 68
  • 2016 Dana's Holding Tank-14.jpg
    2016 Dana's Holding Tank-14.jpg
    2.4 MB · Views: 64
  • 2016 Dana's Holding Tank-15.jpg
    2016 Dana's Holding Tank-15.jpg
    2.4 MB · Views: 64
  • 2016 Dana's Holding Tank-16.jpg
    2016 Dana's Holding Tank-16.jpg
    2.2 MB · Views: 67
  • 2016 Dana's Holding Tank-17.jpg
    2016 Dana's Holding Tank-17.jpg
    2 MB · Views: 67
Jeff
Other than having the tank built in Maine, I did all the work myself. Some of it twice! Thanks.

Jim
 
Dave
Thank you. If you notice the hose clamps in the photos, they all have a little red plastic thing on their tails. Since I am on a blood thinner, we decided that it would be nice if I didn't bleed out while working under the head sink. I have to say that the little buggers really work. the job was finished and I didn't need a visit to the emergency room.

Jim
 
Jim, all I can say is 'wow'.... that is just really impressive... What did you do with the old holding tank in the keel? Did you just leave it be with some chlorine in it or did you fill it up, etc.?
 
John
The old tank has been a hot topic of discussion. My solution was to seal it up with 5 gallons of antifreeze in it. But I like Jeff's idea that leaving any liquid in the tank could result in blisters. So for now (the boat is now back in the water) I pumped it empty before sealing it up. The next time she gets hauled, which should be in the fall of 2017, I'll open the tank up, clean it up, interprotect it then reseal it back up. Again, my concern is a hard grounding that ruptures the keel where I can't get reach the leak. I am still open to ideas on this topic.

Jim
 
I assume you had stocked up on a pallet or two of good, marine-grade cuss-words...

Did you have any left when the project was done, or did you have to re-stock mid-project?


Chris


PS - actually, that looks like a well-enough-planned-out project that you might not have needed any cuss-words at all....

Nice job!
 
Chris
Thanks! Actually the install went relatively expletive free until the work under the head sink began. At that point I couldn't let Bonnie on the boat as I was working. She shouldn't be subjected to those kind of words. The worst part was installing hose clamps with one hand. I even have an access port that allows a second arm to reach inside, but still the vocabulary was stressed. I think the world would be a better place if someone would invent a singlehanded hose clamp.

Jim
 
Jim, where did you find those hose clamp ends? I got two from PYI with the replacement bellows for the dripless, but have never seen them for sale.

As far as the old holding tank: too late now probably, but it could have been used as additional "storage" for when the new HT was filled.
But I think Jeff nailed it. Turn it into a deep bilge with a Rule 3500 and a smaller pump for daily/auto switch use. Then you don't really need to cut into it and seal it from the side. My old Northstar 38 had a deep bilge. I miss it.

Probably could keep your wine chilled down there....nah, never mind!
 
Dave
They are called Clamp-Aid hose clamp end guards. Goggle them and they come up from Amazon. They come in red or black. The black are cheaper but I like the visibility of the red. They come in packages of 20 for $5. I brought 5 packages and am almost run out of them. Who would have thought there are so many hose clamps on board.
I like the idea of storing wine in the deep bilge. Kinda like the Queen Mary 2 that stores her beer in the bulbous bow cutwater. We did store wine in the forward part of the bilge under the sweeping pan on our last trip South. Unfortunately all the labels ended up cruddy. Didn't effect the wine but the bottles no longer looked appealing. And there is still the thought of a keel rupture that wouldn't be able to be sealed. That scares the s__t out of me.

Jim
 
Dave
Bonnie just added that we like to carry our wine in boxes. Not as classy but they store better, are easy to pour and the taste is comparable.

Jim
 
Jim, I am just not sure of what to do with the old HT once it is decommissioned. I like Lee Nicholas's idea of filling it with 2 part foam and sealing it up. I understand the risk Jeff talks about if it developed a slow leak into it, but at least in the event of a very hard grounding and the old HT ruptured, you've got something blocking the path of the water coming in wholesale to the upper bilge, I have been aground five times in 3 1/2 years. Three times were in the same day and I was able to get free on my own out of the muck. The fourth time I grounded on what I suspect was rock and the boat momentum just carried me right up on top of it and I couldn't get free so was towed off (i was at idle speed on the diesel running up to it). The last time was at anchor about three weeks ago and a late afternoon storm combined with the outgoing tide left me up on a sandbar while I was away from the boat. It laid over on it's side and we tried to use the spare halyard to pull over and power off but it didn't work. 2 hours later I was back upright and by 9:00 pm she was floating again. It was good to know that the boat will reflect itself when in this situation. Although embarrassed to admit this happened to me, it did and I'll share it here in the event anyone else comes up to their boat after being away and sees this same thing....

The point of the stories is that at least so far, no groundings have resulted in any keel damage that I or the yards have seen at haulout.... just scrape/scratch marks on the bottom of the keel.
 

Attachments

  • IMG_5779.JPG
    IMG_5779.JPG
    796.2 KB · Views: 57
John
In the words of singer/songwriter Eric Stone: "If you ain't been aground, you ain't been around". Touching the bottom isn't always bad. On the East coast running aground on sand or mud is more embarrassing than dangerous. It's the occasion of a meeting with a hard rock that can ruin your day. In Damage Control training you try to visualize a scenario of the hull being penetrated and how you would go about stopping the inflow of ocean and how you would repair the damage until you can get to a repair facility. In the case of a small penetration of the old holding tank, a bilge pump will most likely stem the flow. But if the aft end of the keel is severely damaged allowing a substantial amount of ocean in, there is not an easy way to stop the flow because you can't reach the damaged area. For now what will allow me to sleep well at night will be to leave the tank empty and seal it up.

Jim
 
Back
Top