• Welcome to this website/forum for people interested in the Morgan 38 Sailboat. Many of our members are 'owners' of Morgan 38s, but you don't need to be an owner to Register/Join.

Maxwell RC8-8 Vertical windlass install

schlepper

John m. Harrison
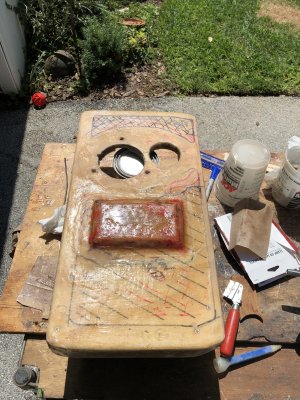
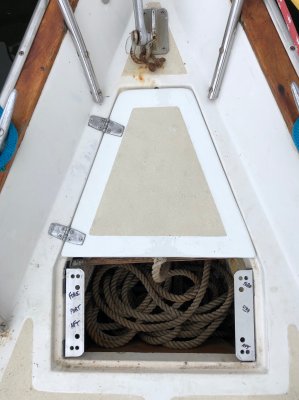
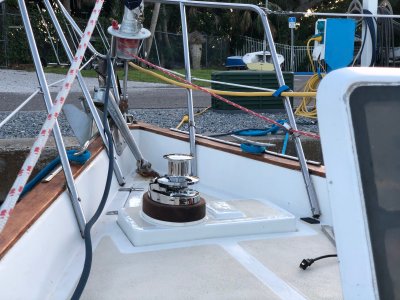
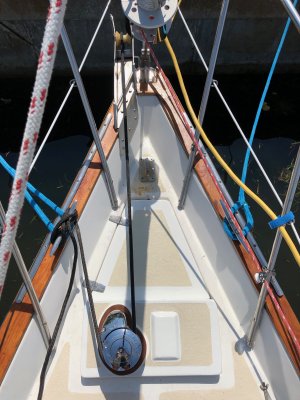
Tried to build a Media folder but having trouble with it. So here is the gist.... I got a like new, unused unit, Maxwell RC8-8. Beautiful unit. Was going to mount it using a teak spacer and between the chain ring and the marine plywood deck plate that would be encapsulated in fiberglass and painted in Awlgrip. I measured and cut the plywood. Took it to the boat to dry fit and realized the deck level, plus the plywood plate (that would be thru bolted to the deck), the teak spacer, and the distance from the teak spacer to the chain ring of the windlass was still too low... I've seen many install variations but many of them have the unit mounted in the already somewhat cramped V-berth, then a pipe running at various angles down into the anchor locker. What to do?! I opted to revisit the deck plate idea and then figure out how to raise it up approximately 2-2 1/2". What I came up with was the same plywood thickness, but undergird it with strips of 3/4" x 1 1/2" oak and then glass/resin the structure, and then mount it in the lip of the aft rectangular portion of the anchor locker lid recess. I made the mock up of it, along with a plywood forward lid (will be keeping the original lid in the event i ever sell the boat, new owner might want a different look, etc. I just awl grip painted the pieces yesterday and will show some photos of it as it has progressed. I plan to mount the piece using aluminum and stainless steel brackets. So far so good... and I don't think it looks too bad either! Slide1.jpg WRuWKRq1Q1qszBNJUxBfJw.jpg 3k%zg8JETU2C2TttKThvAg.jpg
 

Attachments

  • IeWLSbBvRHSi%A4u5MVq4w.jpg
    IeWLSbBvRHSi%A4u5MVq4w.jpg
    3 MB · Views: 149
Keeping the old lid for the next owner ? What are you buying a larger MORGAN ? That 45 center cockpit model sure looks nice
Mr Bankerman !!
 
John i'm tackling the same project right now going down to the boat today to see if the bracket i made will fit up then line up the windlass I'll send some pictures they won't be as nice as your work
Thanks John
 
John i'm tackling the same project right now going down to the boat today to see if the bracket i made will fit up then line up the windlass I'll send some pictures they won't be as nice as your work
Thanks John
1Lostbuoy,
I wrestled with how to do this, and after listening to others with vertical windlasses and then looking at mine when I did a dry run demo in my garage on a 12v battery, that rode and chain wants to be thrown straight down. Most examples I have seen have a hawse pipe at various angles and I wanted to avoid that and drilling holes in my deck if I could avoid it. I am working on bracket install today and in the morning, then wiring tomorrow afternoon and Wednesday, if all goes according to plan!! I will take pictures and post when possible. Here is a dry fit pic hot off the press!
 
IMG_1264.JPG IMG_1262.JPG IMG_1265.JPG
John
Welded this up out of 1/4" 6061 aluminum now I'm afraid the drop tube is too close to the side where the hull v's in and may try to offset it too the middle what do you think. Also what size battery cable are you running to it.
Thanks John Mcdonagh
 
John Mcdonagh , What beautiful welding work ! Great idea too! Solid as Sears used to be !!
 
John McDonough, in looking at your bracket, the idea is impressive. I had considered something similar, as I have a neighbor who has a fabrication business and has all of the industrial equipment, welding capability for all metals, and a powdercoat booth as well. However, as I tried to figure out how to fabricate it, I just couldn't make it work on my boat. The aft end of my upper locker is cut out as it had become saturated and had a great deal of rot in the plywood. The forward face of the V-berth locker also had pockets of rot so I fiberglassed in a 3/4" ply reinforcement to the bulkhead, but I left the cut out portion of the upper locker floor. You can see my pictures of the 'false floor' I put in the lower locker to keep seawater from draining underneath the v-berth and into the mast step, etc (and all of the anchor silt with it!) and instead drilled a hole in the side of the locker above the water line and put a small chromed clamshell on it. I epoxied the inside of the drain hole as I am wary of having any delamination from water intrusion.
With respect to the new windlass concept I am using, in reviewing the Maxwell documentation, i was challenged with the problem of getting the windlass chain ring at the proper level for the rode/chain to enter at the level angle as per the instructions. I also had to move the windlass to Port as the entry angle of the rode/chain, if it's too far to port, the chain is going to scuff the heck out of the chrome rode/chain guide. So I calculated that my bracket, with the height of the plywood, the height of the oak undergirding, the poly board spacer and the teak spacer, would get me to almost the exact calculated height above the deck. So my assessment to share with you would be:
1.) to get the windlass high enough for the proper horizontal entry into the chain ring by the rode/chain is level or as close as possible to it,
2.) be sure the windlass is far enough over to port so the entry angle is perpendicular to the chain ring.

As for the cable size, the Maxwell install guide has a recommended wire size depending on how far the unit is from the battery and the resultant voltage drop....
 
Nice job on the arrangement. Here are some comments and warnings, for what they are worth. You need a way to reach down into the locker from above. I have a waterproof hand hole. Your rode may not, probably will not, self-stow, so you have to be able to get into the lower locker to help it. (Unless you have crew below in the forecastle doing it.) Your approach having the aft part of the locker floor raised (as I understand it) should help, but chains and even more, rope, resist self-stowing. For the same reason, I would not have a long pipe. Just have a hole, so the chain can build a tower and, if you are lucky, tip over when it gets high. Finally, how are you going to attach the aluminum base to the boat? While you will not use the windlass to hold the chain once anchored (using a snubber to a cleat), raising the anchor still imposes quite a load on the windlass and it needs to be well attached to the boat. My vertical windlass sits on a low wood pedestal behind the locker hatch and feeds to the locker thru an angled tube. Some day I will raise the aft part of the locker shelf as you have done in order to get more self-storing room. As it is, I have to keep knocking the chain down from above as I get to the last 60 fee or so. Means I cannot raise the anchor from the cockpit.
 
Terry, i cut the floor out of my aft 12-14" of the upper locker so it is a free fall to the 'false floor' I tabbed into the locker last year. I also glassed in marine plywood panel over some rot on the forward edge of the v berth bulkhead and in the process, covered the opening from v-berth to anchor locker. At the same time, I put a marine ply divider that is screwed and tabbed in the aft end of the upper locker floor that remains to retain storage for dock lines, etc.; I am going to be cutting that down to provide an easier access if I have to help the rode or chain to unpile, etc.. I am going to try to post some pictures here.... Also, I put the battery in the starboard storage locker under the V-berth along with mounting the solenoid there and then have the breaker switch facing aft on that panel of teak plywood.... so it's easily visible and reachable to flip it on. Anyone with an RC8-8 or other Maxwell windlasses, be very careful with the breaker switch when you are putting it in your cutout hole. Th plastic tabs for the screws holding the actual switch to the plastic cover plate are very thin. As I was putting mine in the hole, it caught on an uneven piece of the jig sawed hole and snapped right off. West System 6/10 saved the day (again). My L brackets are mounted thru the fiberglass lip of the locker. That is pretty thick resin/glass there (I'd say about 3/8-1/2"?) and it will have three bolts holding it on there. The mounting plate itself will have stainless screws/studs drilled and epoxied in, that will bolt to the L bracket, 2 per side. I will be working on that later today (Thursday April 11). I'll post an update with pictures after i get that going. I also plan to put some epoxy and 5200 around the edge where the mounting platform goes into the recess in the deck for the old hatch. If anyone has any admonition or suggestions on what I am doing, please feel free... but dry fit in there, it sure looks good and my lower back feels better already! Thanks!!


IMG_2973.jpeg
 

Attachments

  • IMG_2977.jpeg
    IMG_2977.jpeg
    1.5 MB · Views: 145
  • IMG_3039.jpeg
    IMG_3039.jpeg
    2.5 MB · Views: 170
  • IMG_3036.jpeg
    IMG_3036.jpeg
    2 MB · Views: 159
I went back down to the boat Saturday midday and worked until this evening (Sunday). I got a solid 1 1/2 days of work in on the windlass as well as got my 741 Garmin chart plotter mounted on a swivel bracket on the pedestal guard. I have my old 541 Garmin mounted on the very top of the pedestal guard and once my normal places are on the new chart plotter, I plan to move the 541 down to the chart table as my backup GPS and replace the 182C ancient specimen that is down there now.

I got the windlass mounted to the bracket and it is tight and feels very solid. I am not 100% finished yet, however, I did get a chance to try it out with no rode or chain, just to confirm the electric works, etc. I am ordering a Jeep wireless remote control to try, they are dirt cheap versus what Vetus/Maxwell sells new for the same utility function. I did make one field modification from the original mockup. I too measurements with a tape measure to figure the height of the windlass chain ring. However, I did not recognize at the time that the chain ring is BELOW the level of the pulpit roller which sits higher on mine. Therefore, I angled the windlass platform higher in the front edge than the back so as to make the entry of the rode/chain more or less level, i.e. no angle coming in. I will post pictures with a black dock line, tied to a mallet hanging of the pulpit roller so as to give a fairly tight line and then wrapped it around the chain ring and tied off on a cleat.... I think this is a better setup than what I was going to have which as it turns out would have been angled....

All told, i did get to tighten all wire connections, got the switch installed at the helm, and was able to operate the windlass, albeit with no rode or chain in it as I don't have the right size/splice, etc... now I can go buy it!
 

Attachments

  • IMG_3141.jpeg
    IMG_3141.jpeg
    2.5 MB · Views: 107
  • 57696358453__1C5DF8B0-89F2-4995-AA74-BA05CA23A9D7.jpg
    57696358453__1C5DF8B0-89F2-4995-AA74-BA05CA23A9D7.jpg
    2.1 MB · Views: 85
You have done a beautiful job , I think there is a need in Bradenton for another boatwright like you !
 
here is a video on Youtube that I put together yesterday about the windlass project... hope it gives others ideas of what you don't want to do (!) or if it helps you with what you want to do, etc.. I'm a novice boatwright and even a less of a video editor.. but giving it he11 anyway!

 
John
Great job! Your going to get great use out of the windlass. A couple of questions: Do you have control of the unit from the foredeck? Do you have a wash down system? How much chain are you using?

Jim
 
Hey Jim, I am going to use between 50 and 75' of chain... I just realized yesterday that a huge pile of chain that I have, some 300' continuous, is of the right size.... so I will be cutting off a section of it to use. All i need now is the rode, and to splice it or course. I ordered a 4x4 wireless control as well as a direct wire pistol grip also non-marine for about $40 total yesterday and should have before next trip to the boat. I will use the bucket method for now to wash down but plan to rig up a wash down pump and hose soon... i know it is a muddy mess if you don't have it.

If you look at the lip around the anchor locker it is very thick fiberglass and with the mechanical attachment points i will have, I think it will be like the rock of Gibraltar in there, i.e. won't be going anywhere the way I have it installed. If I ever sell the boat (egads!), I want any successive owner to be able to remove it all without destroying the deck or locker.... and if they so desire, replace with the original lid which I have (I made the new forward lid, choosing not to cut down the original).. call me nuts, but I know I always appreciate that kind of attentiveness of a previous owner if I am looking at a boat or car, etc... that has been modified in some way.
 
John
Since you have that much chain, why not use an all chain rode? It would eliminate having to switch from gypsy to drum each time, which will keep your fingers away from the machine. I'm glad you are going to use a handheld remote. That automatically reduces the chance of an injury by 50%. We have seen two severe medical emergencies with the use of deck mounted foot buttons.

You will love a wash down pump up on the bow. If the rode gets stored muddy, the smell down below can get pretty funky.

Jim
 
Thanks Jim, I got the idea for the automotive wireless from Lee Nicholas, my mentor in Sailboat projects... St. Nick has 'been there and done that' so I appreciate his advice. Although the automotive equipment might not hold up that well in the marine environment, they are just dirt cheap... so I'm hard-wiring it as well and the wire joints for that will be inside the boat, which has the dehumidifier running 24/7 when we're not aboard which helps cut down on rust and corrosion in the cabin. Of course the wireless hand held, etc. will be stored inside as well helping to extend it's life too. The new wireless and hard wired stuff from Maxwell is exorbitant and as I learned with the breaker switch, it is not necessarily as bullet proof as the casting/mechanical workings... so I have my fingers crossed that I will have a good setup. I like the thought of all chain, but I like the stretch of the 8 or 12 strand rode and with that much chain on the bottom, I can sleep lie a baby even in a blow, but not have to have a separate bridle, etc...
BTW, my lower anchor locker is not accessible from the V-berth any longer, I screwed and glassed a 3/4" marine plywood panel on the bulkhead from just above the 'false floor' I tabbed into the bottom of the anchor locker and it goes all the way up to just below the lip of the locker. That has pretty much eliminated the mildew problems I had in the v-berth previously. And no more mud in the mast step! I have a drain hole on the starboard side with a chrome clamshell so water can get out and the false floor is slightly tilted to that side so the water will drain out. I epoxied a plastic tube in the drain hole so the above water line core is protected as well...
 
Geez John, you have upped the expectations, just got use to putting pictures on the site. Always nice to see who we are communicating with online. Nice job on the windlass and video!
 
Thanks Rick, I am just trying to do the best I can with my limited experience and shade tree knowledge... thank God for this forum and for several of the members on here that are so selfless in helping out us neophytes to serious boat ownership!!
 
john, I like he idea of the "floor" in the anchor locker, but ... you had to place a drain very low on the hull, as I understand it. When you heel, does water come into the anchor locker or does the boat's velocity prevent that?
 
I place my vertical aft of the upper locker so that a rode chain and Fortress could be placed there. The windlass is backed a plate of SS across the underside.with power routing from the battery bank.

Jim

 
I place my vertical aft of the upper locker so that a rode chain and Fortress could be placed there. The windlass is backed a plate of SS across the underside.with power routing from the battery bank.

Jim

Hi Jim
I always ask where you are? Hope you are well. I’ll miss the expertise you have.
 
Back
Top